RocketMQ 通信

2. remoting

[TOC]

RocketMQ的通讯模块实现的比较简单,不像Dubbo那样给用户提供多种可选的方式,只有一种基于通讯框架Netty的实现方式。
其最主要的两个类是NettyRemotingServerNettyRemotingClient。以下为其类图:

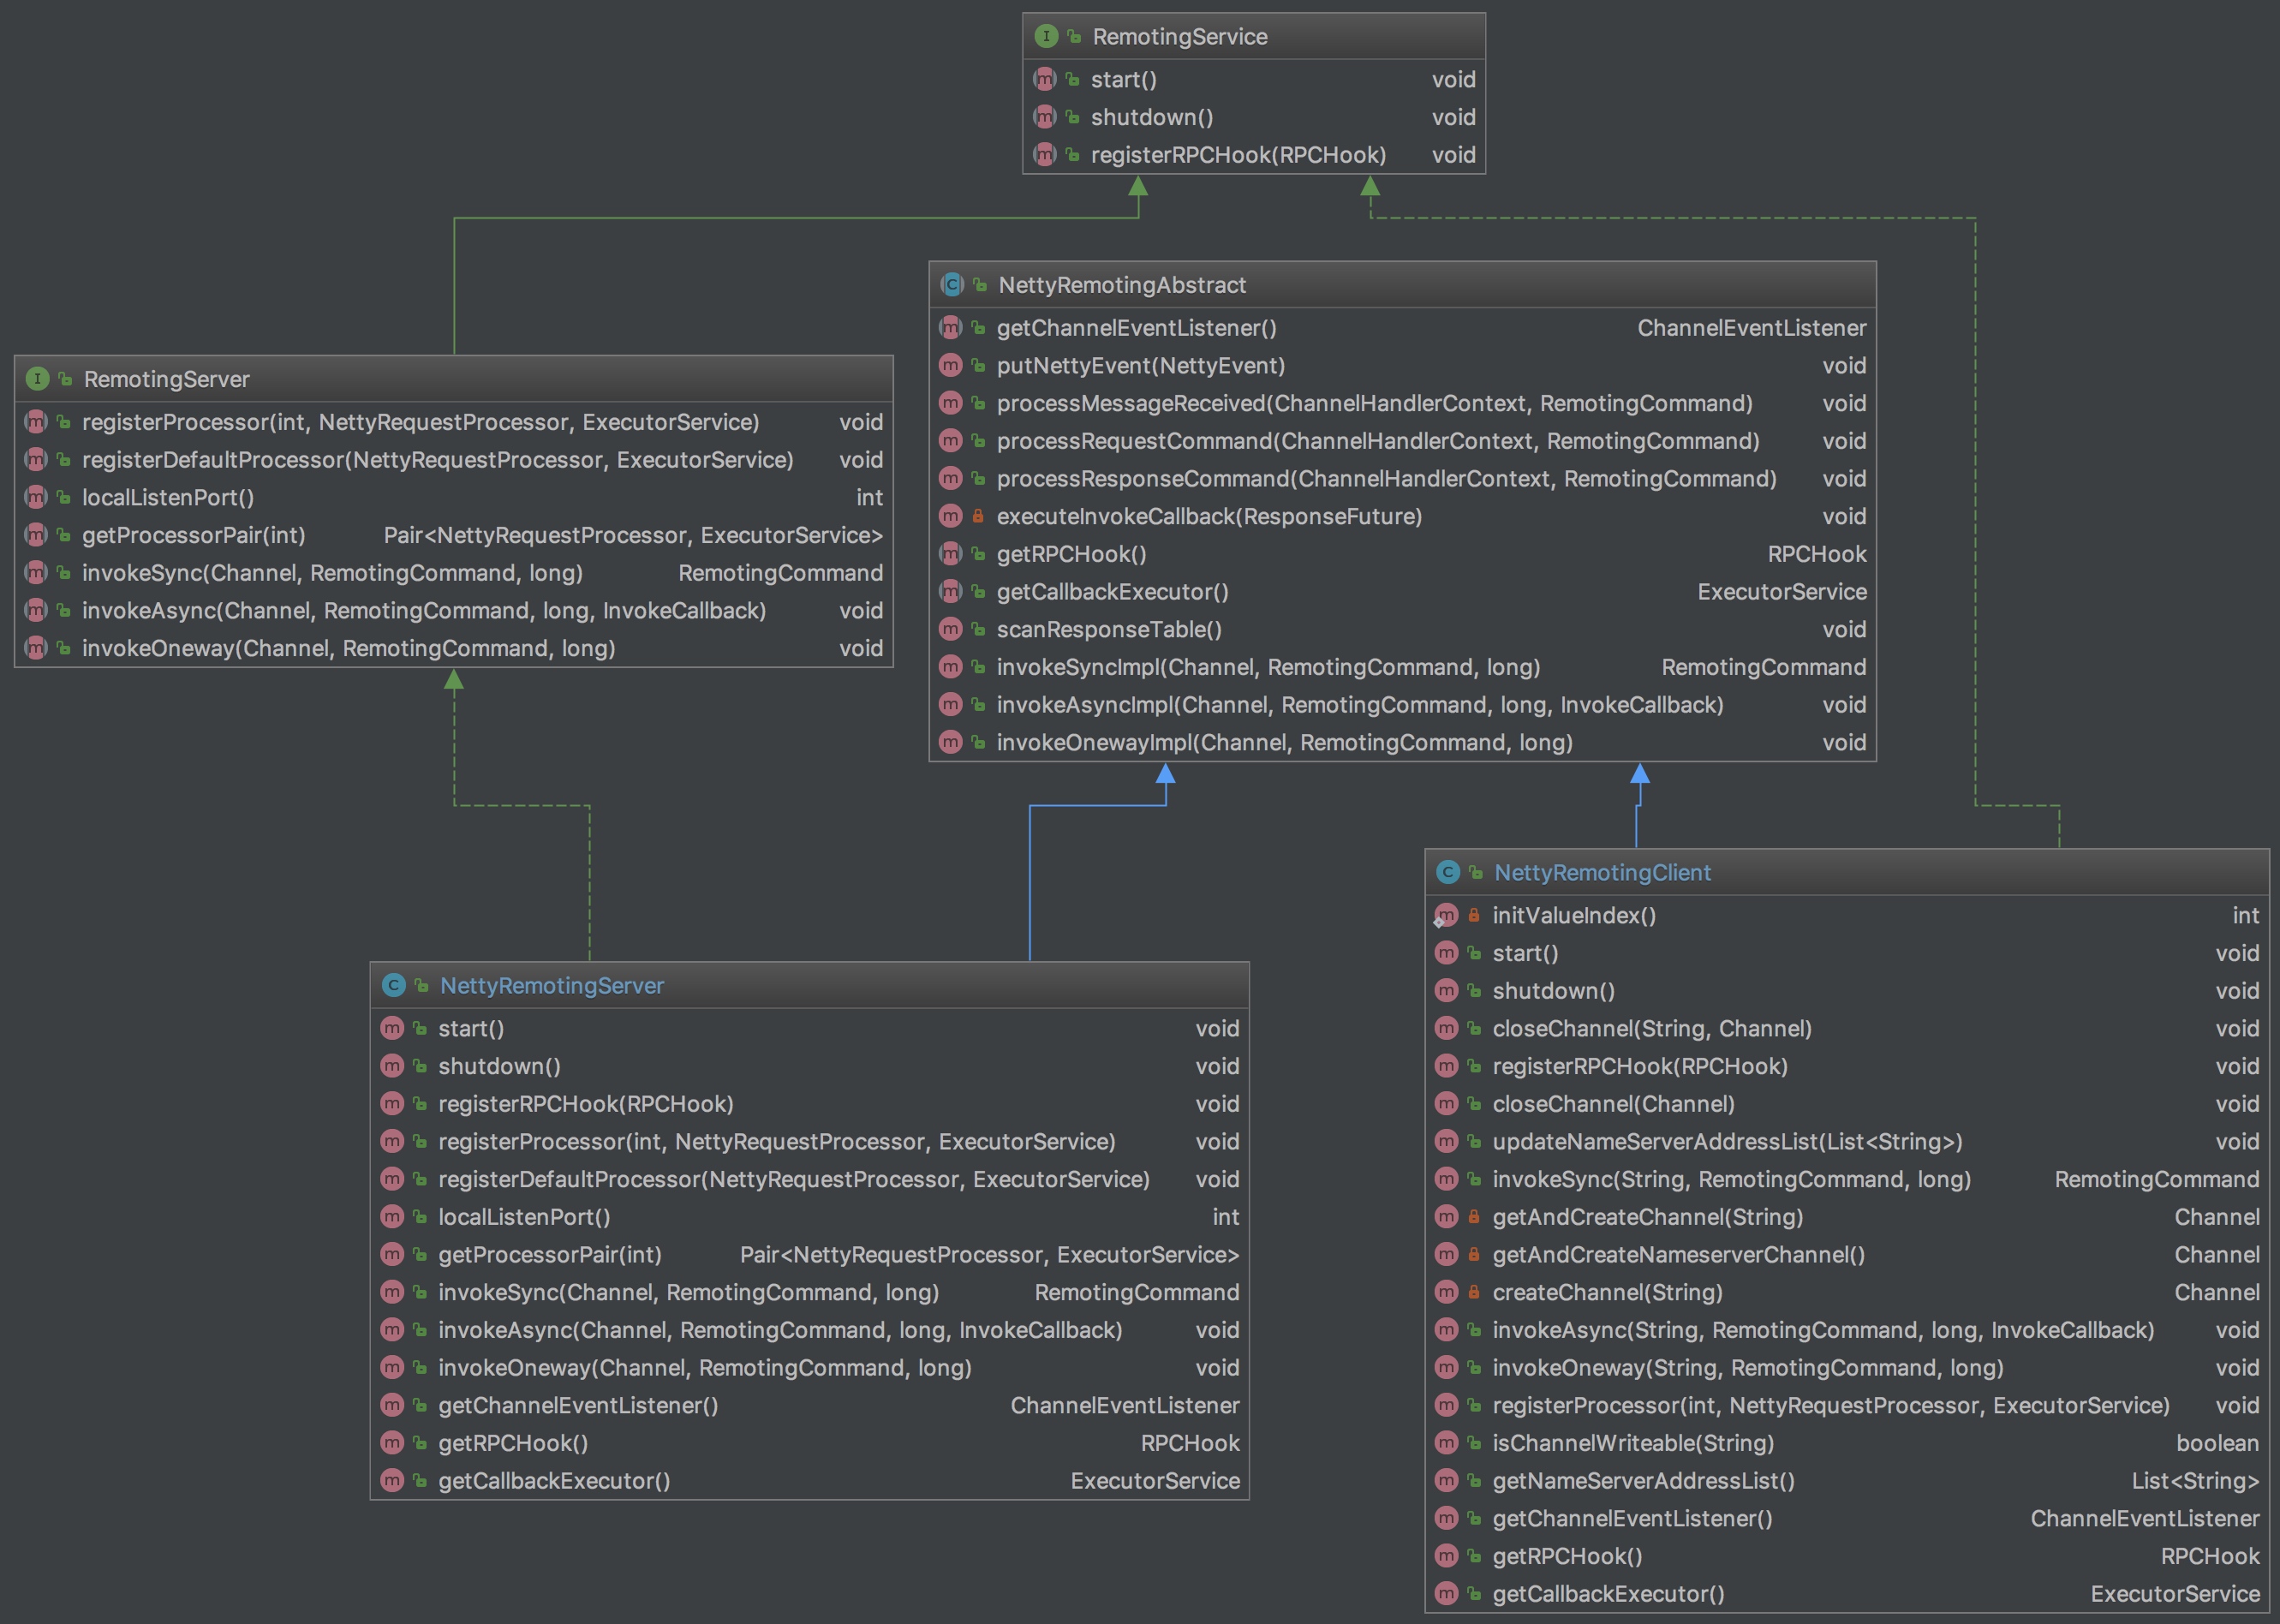
首先我们来分析Server部分,再看Client部分。

Server:

1. 初始化

首先初始化Server,初始化Netty 的AcceptorEventLoopGroup和SelectorEventLoopGroup,并设置限流阈值和通道事件监听器。

1
2
3
4
5
6
7
8
9
10
11
12
13
14
15
16
17
18
19
20
21
22
23
24
25
26
27
28
29
30
31
32
33
34
35
36
37
38
39
40
41
42
43
44
45
46
47
48
49
50
public NettyRemotingServer(final NettyServerConfig nettyServerConfig, final ChannelEventListener channelEventListener) {
// 限流,设置信号量,设置同一时间单向请求和异步请求最大的请求数。
super(nettyServerConfig.getServerOnewaySemaphoreValue(), nettyServerConfig.getServerAsyncSemaphoreValue());
this.serverBootstrap = new ServerBootstrap();
this.nettyServerConfig = nettyServerConfig;
// 设置通道事件监听器
this.channelEventListener = channelEventListener;
int publicThreadNums = nettyServerConfig.getServerCallbackExecutorThreads();
if (publicThreadNums <= 0) {
publicThreadNums = 4;
}
// 通用的处理线程池实例化,当业务方没有设置processor的线程池时,使用共用的线程池publiceExecutor
this.publicExecutor = Executors.newFixedThreadPool(publicThreadNums, new ThreadFactory() {
private AtomicInteger threadIndex = new AtomicInteger(0);
@Override
public Thread newThread(Runnable r) {
return new Thread(r, "NettyServerPublicExecutor_" + this.threadIndex.incrementAndGet());
}
});
// 设置Netty Acceptor线程池大小
this.eventLoopGroupBoss = new NioEventLoopGroup(1, new ThreadFactory() {
private AtomicInteger threadIndex = new AtomicInteger(0);
@Override
public Thread newThread(Runnable r) {
return new Thread(r, String.format("NettyBoss_%d", this.threadIndex.incrementAndGet()));
}
});
// 设置Netty Selector线程池大小,此处判断若是linux平台,使用Epoll线程池,否则使用
if (RemotingUtil.isLinuxPlatform() //
&& nettyServerConfig.isUseEpollNativeSelector()) {
this.eventLoopGroupSelector = new EpollEventLoopGroup(nettyServerConfig.getServerSelectorThreads(), new ThreadFactory() {
private AtomicInteger threadIndex = new AtomicInteger(0);
private int threadTotal = nettyServerConfig.getServerSelectorThreads();
@Override
public Thread newThread(Runnable r) {
return new Thread(r, String.format("NettyServerEPOLLSelector_%d_%d", threadTotal, this.threadIndex.incrementAndGet()));
}
});
} else {
//否则使用一般的
this.eventLoopGroupSelector = new NioEventLoopGroup(nettyServerConfig.getServerSelectorThreads(), new ThreadFactory() {
private AtomicInteger threadIndex = new AtomicInteger(0);
private int threadTotal = nettyServerConfig.getServerSelectorThreads();
@Override
public Thread newThread(Runnable r) {
return new Thread(r, String.format("NettyServerNIOSelector_%d_%d", threadTotal, this.threadIndex.incrementAndGet()));
}
});
}
}

2. 启动

调用start()方法,启动Server。监听端口,开启服务,并开启后台线程,扫描超时的响应并作回调。

1
2
3
4
5
6
7
8
9
10
11
12
13
14
15
16
17
18
19
20
21
22
23
24
25
26
27
28
29
30
31
32
33
34
35
36
37
38
39
40
41
42
43
44
45
46
47
48
49
50
51
52
53
public void start() {
//...
ServerBootstrap childHandler =
this.serverBootstrap.group(this.eventLoopGroupBoss, this.eventLoopGroupSelector).channel(NioServerSocketChannel.class)
.option(ChannelOption.SO_BACKLOG, 1024)
.option(ChannelOption.SO_REUSEADDR, true)
.option(ChannelOption.SO_KEEPALIVE, false)
.childOption(ChannelOption.TCP_NODELAY, true)
.option(ChannelOption.SO_SNDBUF, nettyServerConfig.getServerSocketSndBufSize())
.option(ChannelOption.SO_RCVBUF, nettyServerConfig.getServerSocketRcvBufSize())
.localAddress(new InetSocketAddress(this.nettyServerConfig.getListenPort()))
.childHandler(new ChannelInitializer<SocketChannel>() {
@Override
public void initChannel(SocketChannel ch) throws Exception {
ch.pipeline().addLast(
defaultEventExecutorGroup,
new NettyEncoder(),
new NettyDecoder(),
new IdleStateHandler(0, 0, nettyServerConfig.getServerChannelMaxIdleTimeSeconds()),
// 触发Channel状态变化监听事件
new NettyConnetManageHandler(),
// 业务处理逻辑
new NettyServerHandler());
}
});

if (nettyServerConfig.isServerPooledByteBufAllocatorEnable()) {
childHandler.childOption(ChannelOption.ALLOCATOR, PooledByteBufAllocator.DEFAULT);
}
try {
// 启动NettyServer,监听端口并接收请求
ChannelFuture sync = this.serverBootstrap.bind().sync();
InetSocketAddress addr = (InetSocketAddress) sync.channel().localAddress();
this.port = addr.getPort();
} catch (InterruptedException e1) {
throw new RuntimeException("this.serverBootstrap.bind().sync() InterruptedException", e1);
}
//启动netty事件处理器,当channel状态发生变化时,通知相应事件。这里即是通知`BrokerHousekeepingService`进行相应的处理。
if (this.channelEventListener != null) {
this.nettyEventExecuter.start();
}
//扫描响应列表,当有response超时未返回时,则触发回调函数返回
this.timer.scheduleAtFixedRate(new TimerTask() {
@Override
public void run() {
try {
NettyRemotingServer.this.scanResponseTable();
} catch (Exception e) {
log.error("scanResponseTable exception", e);
}
}
}, 1000 * 3, 1000);
}

另外,NettyRemotingServer提供了两个方法给使用方用于注册自己的业务处理器NettyRequestProcessor(每个需要提供服务的组件,实现这个接口并向RemotingServer中注册):

1
2
3
4
5
6
7
8
9
10
11
12
13
14
15
16
17
18
19
20
/**
* 注册处理器
* @param requestCode 请求码
* @param processor 请求处理器
* @param executor 处理线程池
*/
public void registerProcessor(int requestCode, NettyRequestProcessor processor, ExecutorService executor) {
ExecutorService executorThis = executor;
//若没有设置,则使用共用的publicExecutor线程池
if (null == executor) {
executorThis = this.publicExecutor;
}
Pair<NettyRequestProcessor, ExecutorService> pair = new Pair<NettyRequestProcessor, ExecutorService>(processor, executorThis);
this.processorTable.put(requestCode, pair);
}

// 注册默认处理器,及当没有其他处理器时,使用此处理器
public void registerDefaultProcessor(NettyRequestProcessor processor, ExecutorService executor) {
this.defaultRequestProcessor = new Pair<NettyRequestProcessor, ExecutorService>(processor, executor);
}

3. 调用

当请求到达后,Netty进行解码后最终交给NettyServerHandler进行处理:

1
2
3
4
5
6
class NettyServerHandler extends SimpleChannelInboundHandler<RemotingCommand> {
@Override
protected void channelRead0(ChannelHandlerContext ctx, RemotingCommand msg) throws Exception {
processMessageReceived(ctx, msg);
}
}

NettyServerHandler调用NettyRemotingAbstract.processRequestCommand来进行处理:

1
2
3
4
5
6
7
8
9
10
11
12
13
14
15
16
public void processMessageReceived(ChannelHandlerContext ctx, RemotingCommand msg) throws Exception {
final RemotingCommand cmd = msg;
if (cmd != null) {
//根据cmd的类型进行不同的处理
switch (cmd.getType()) {
case REQUEST_COMMAND:
processRequestCommand(ctx, cmd);
break;
case RESPONSE_COMMAND:
processResponseCommand(ctx, cmd);
break;
default:
break;
}
}
}

继续跟进,processRequestCommand中会根据请求码去看是否注册了相应的RequestProcessor,若没有则使用默认RequestProcessor

1
2
3
4
5
6
7
8
9
10
11
12
13
14
15
16
17
18
19
20
21
22
public void processRequestCommand(final ChannelHandlerContext ctx, final RemotingCommand cmd)
//根绝请求码去取请求处理器,如果没有则使用默认的处理器
final Pair<NettyRequestProcessor, ExecutorService> matched = this.processorTable.get(cmd.getCode());
final Pair<NettyRequestProcessor, ExecutorService> pair = null == matched ? this.defaultRequestProcessor : matched;
final int opaque = cmd.getOpaque();
Runnable run = new Runnable() {
@Override
public void run() {
final RemotingCommand response = pair.getObject1().processRequest(ctx, cmd);
if (!cmd.isOnewayRPC()) {
if (response != null) {
response.setOpaque(opaque);
response.markResponseType();
ctx.writeAndFlush(response);
}
}
}
}
// 进行异步处理请求
final RequestTask requestTask = new RequestTask(run, ctx.channel(), cmd);
pair.getObject2().submit(requestTask);
}

Client

1. 初始化与启动

其初始化和启动过程与Server大致相似,且比Server做的事要少。其主要是初始化io.netty.bootstrap.Boostrap,设置参数,并启动事件处理线程和扫描响应线程等。

3. 调用

其主要提供三个调用形式:

  1. invokeSync:同步阻塞调用;
  2. invokeOneway:单向调用,不需要反馈结果;
  3. invokeAsync:异步调用,结果返回后触发回调逻辑。

invokeSync为例来讲解调用的过程,其他两种方式类似。

1
2
3
4
5
6
7
8
9
10
11
12
13
public RemotingCommand invokeSync(String addr, final RemotingCommand request, long timeoutMillis)
throws InterruptedException, ... {
//根据地址来获取通讯通道,如果没有则创建
final Channel channel = this.getAndCreateChannel(addr);
if (channel != null && channel.isActive()) {
RemotingCommand response = this.invokeSyncImpl(channel, request, timeoutMillis);
return response;
//...
} else {
this.closeChannel(addr, channel);
throw new RemotingConnectException(addr);
}
}

首先获取Channel,然后通过Channel来发送请求。

1
2
3
4
5
6
7
8
9
10
11
12
13
14
15
16
17
18
19
20
21
22
23
24
25
26
27
28
29
30
31
32
33
34
35
36
37
38
39
40
41
42
43
44
45
46
47
48
49
50
51
52
53
54
55
56
57
58
59
60
61
62
63
64
65
66
/**
* 根据调用地址获取缓存的Channel,如果没有则创建Channel
* 当 addr为空的时候创建到NameServer的Channel
* @param addr
* @return
* @throws InterruptedException
*/
private Channel getAndCreateChannel(final String addr) throws InterruptedException {
if (null == addr)
return getAndCreateNameserverChannel();
ChannelWrapper cw = this.channelTables.get(addr);
if (cw != null && cw.isOK()) {
return cw.getChannel();
}
//创建Channel
return this.createChannel(addr);
}

private Channel createChannel(final String addr) throws InterruptedException {
ChannelWrapper cw = this.channelTables.get(addr);
if (cw != null && cw.isOK()) {
return cw.getChannel();
}
if (this.lockChannelTables.tryLock(LOCK_TIMEOUT_MILLIS, TimeUnit.MILLISECONDS)) {
try {
boolean createNewConnection = false;
cw = this.channelTables.get(addr);
if (cw != null) {
if (cw.isOK()) {
return cw.getChannel();
} else if (!cw.getChannelFuture().isDone()) {
createNewConnection = false;
} else {
this.channelTables.remove(addr);
createNewConnection = true;
}
} else {
createNewConnection = true;
}
if (createNewConnection) {
//发起连接
ChannelFuture channelFuture = this.bootstrap.connect(RemotingHelper.string2SocketAddress(addr));
cw = new ChannelWrapper(channelFuture);
this.channelTables.put(addr, cw);
}
} finally {
this.lockChannelTables.unlock();
}
}
if (cw != null) {
ChannelFuture channelFuture = cw.getChannelFuture();
//等待完成连接
if (channelFuture.awaitUninterruptibly(this.nettyClientConfig.getConnectTimeoutMillis())) {
if (cw.isOK()) {
log.info("createChannel: connect remote host[{}] success, {}", addr, channelFuture.toString());
return cw.getChannel();
} else {
log.warn("createChannel: connect remote host[" + addr + "] failed, " + channelFuture.toString(), channelFuture.cause());
}
} else {
log.warn("createChannel: connect remote host[{}] timeout {}ms, {}", addr, this.nettyClientConfig.getConnectTimeoutMillis(),
channelFuture.toString());
}
}
return null;
}

获取Channel后,发起请求:

1
2
3
4
5
6
7
8
9
10
11
12
13
14
15
16
17
18
19
20
21
22
23
24
25
26
27
28
29
30
31
32
33
34
35
36
37
38
public RemotingCommand invokeSyncImpl(final Channel channel, final RemotingCommand request, final long timeoutMillis)
throws InterruptedException, RemotingSendRequestException, RemotingTimeoutException {
final int opaque = request.getOpaque();
try {
final ResponseFuture responseFuture = new ResponseFuture(opaque, timeoutMillis, null, null);
this.responseTable.put(opaque, responseFuture);
final SocketAddress addr = channel.remoteAddress();
// 请求结束后,
channel.writeAndFlush(request).addListener(new ChannelFutureListener() {
@Override
public void operationComplete(ChannelFuture f) throws Exception {
if (f.isSuccess()) {
responseFuture.setSendRequestOK(true);
return;
} else {
responseFuture.setSendRequestOK(false);
}
responseTable.remove(opaque);
responseFuture.setCause(f.cause());
responseFuture.putResponse(null);
PLOG.warn("send a request command to channel <" + addr + "> failed.");
}
});

RemotingCommand responseCommand = responseFuture.waitResponse(timeoutMillis);
if (null == responseCommand) {
if (responseFuture.isSendRequestOK()) {
throw new RemotingTimeoutException(RemotingHelper.parseSocketAddressAddr(addr), timeoutMillis,
responseFuture.getCause());
} else {
throw new RemotingSendRequestException(RemotingHelper.parseSocketAddressAddr(addr), responseFuture.getCause());
}
}
return responseCommand;
} finally {
this.responseTable.remove(opaque);
}
}

看完后,肯定会很奇怪:这里responseFuture根本没有设置返回值啊,怎么返回的?
这是因为在NettyClient初始化的时候设置了NettyClientHandler,其最终会调用NettyRemotingAbstractprocessResponseCommand方法:

1
2
3
4
5
6
7
8
9
10
11
12
13
14
15
16
public void processResponseCommand(ChannelHandlerContext ctx, RemotingCommand cmd) {
final int opaque = cmd.getOpaque();
//获取Future
final ResponseFuture responseFuture = responseTable.get(opaque);
if (responseFuture != null) {
responseFuture.setResponseCommand(cmd);
responseFuture.release();
responseTable.remove(opaque);
if (responseFuture.getInvokeCallback() != null) {
executeInvokeCallback(responseFuture);
} else {
//设置返回值
responseFuture.putResponse(cmd);
}
}
}

到此,RocketMQ的通讯模块就分析结束了。可以感受到,其实现的比较粗糙。

您的支持是我创作源源不断的动力