Hystrix-实践

Hystrix使用

Hystrix的使用方式有两种:原生和注解
首先引入依赖Change Log

1
2
3
4
5
6
7
8
9
10
11
<dependency>
<groupId>com.netflix.hystrix</groupId>
<artifactId>hystrix-core</artifactId>
<version>${hystrix.version}</version>
</dependency>
<!--引入 Hystrix注解切面-->
<dependency>
<groupId>com.netflix.hystrix</groupId>
<artifactId>hystrix-javanica</artifactId>
<version>${hystrix.version}</version>
</dependency>

Hystrix提供了非常便捷的封装 – 两个可继承的抽象类HystrixCommand/HystrixObservableCommand。只需继承它们,实现run()/construct()方法,在方法中实现对需要隔离的外部依赖和逻辑,即可享受Hystrix带来的诸多好处。
HystrixCommand 有四种方法供不同场景需求:execute()/queue()/observe()/toObservable()HystrixObservableCommand提供observe()/toObservable()

  • 四种方法的功能:
    • execute():以同步堵塞方式执行run()
    • queue():以异步非堵塞方式执行run()
    • observe():事件注册前执行run()/construct()HystrixCommand 会创建新线程非阻塞执行run()HystrixObservableCommand 则会在调用程序里执行construct()
    • toObservable():事件注册后执行run()/construct()。调用toObservable() 会直接返回一个就直接返回一个Observable<R>对象,而不去执行。当执行subscribe时,才会去执行逻辑 run()方法中的逻辑或者HystrixObservableCommandconstrcut()返回的Observable中的逻辑。与上面一样,HystrixCommand创建一个线程来执行逻辑,而HystrixObservableCommand会直接使用调用线程执行。

首先,来简单看一看 Hystrix官方Wiki给出的例子(movie-ocs中的 xxx

1
2
3
4
5
6
7
8
9
10
11
12
13
14
15
16
17
18
19
20
21
22
23
24
25
26
27
28
29
30
31
32
33
34
35
36
37
38
39
40
41
42
43
44
45
46
47
48
49
50
51
52
53
54
55
56
57
58
59
60
61
62
63
64
65
66
67
68
69
70
71
72
73
74
75
76
77
78
79
80
81
82
83
84
85
86
87
88
89
90
91
92
93
public class CommandHelloWorld extends HystrixCommand<String> {
private final String name;
public CommandHelloWorld(String name) {
Setter setter = Setter.withGroupKey(
HystrixCommandGroupKey.Factory.asKey("helloWorldGroup"))
.andCommandKey(HystrixCommandKey.Factory.asKey("helloWorldQuery")
.andThreadPoolKey(HystrixThreadPoolKey.Factory.asKey("helloWorldThreadPollKey"))
.andCommandPropertiesDefaults(HystrixCommandProperties.Setter()
.withExecutionIsolationStrategy(THREAD))//SEMAPHORE
);
super(setter);
this.name = name;
}
@Override
protected String run() {
//实现业务逻辑
System.out.println("Time:" + System.currentTimeMillis() + ",Thread:" +Thread.currentThread().getName());
return "Hello " + name + "!";
}
public static class UnitTest {
//同步模式访问
@Test
public void testSynchronous() {
assertEquals("Hello World!", new CommandHelloWorld("World").execute());
assertEquals("Hello Bob!", new CommandHelloWorld("Bob").execute());
}
//阻塞模式的异步
@Test
public void testAsynchronous1() throws Exception {
assertEquals("Hello World!", new CommandHelloWorld("World").queue().get());
assertEquals("Hello Bob!", new CommandHelloWorld("Bob").queue().get());
}
//异步
@Test
public void testAsynchronous2() throws Exception {
Future<String> fWorld = new CommandHelloWorld("World").queue();
Future<String> fBob = new CommandHelloWorld("Bob").queue();
assertEquals("Hello World!", fWorld.get());
assertEquals("Hello Bob!", fBob.get());
}
//监听模式
@Test
public void testObservable() throws Exception {
Observable<String> fWorld = new CommandHelloWorld("World").observe();
Observable<String> fBob = new CommandHelloWorld("Bob").observe();
System.out.println("This Step");
// 阻塞
assertEquals("Hello World!", fWorld.toBlocking().single());
assertEquals("Hello Bob!", fBob.toBlocking().single());
// 非阻塞模式
// - 冗长的匿名内部类
fWorld.subscribe(new Observer<String>() {
@Override
public void onCompleted() {
}
@Override
public void onError(Throwable e) {
}
@Override
public void onNext(String v) {
System.out.println("onNext: " + v);
}
});
/*
Time: 1501830396399, Thread: hystrix-ExampleGroup-7
This Step
*/
//非阻塞模式,省略了异常和onCompleted标记
fBob.subscribe(new Action1<String>() {
@Override
public void call(String v) {
System.out.println("onNext: " + v);
}
});
}
//仅当被订阅时,才会执行run里面的逻辑
@Test
public void toObserables() {
Observable<String> kitty = new CommandHelloWorld("Kitty").toObservable();
System.out.println("This Step");
kitty.subscribe(new Action1<String>() {
@Override
public void call(String s) {
System.out.printf(s);
}
});
}
//输出结果:
//This Step
//Time: 1501830396400, Thread: hystrix-ExampleGroup-8
//Hello Kitty!
}
}

刚说了还有一种继承 HystrixObservableCommand ,相对于HystrixCommand它只提供了observe()toObservable()方法。那么它存在的意义是啥?

来看看它们的差别:

  • 表面的差别:除了名字不一样,前者的业务逻辑写在run()里,并直接返回结果;后者的命令逻辑写在construct()返回 Observable<R>;

  • 前者默认是线程隔离,后者是信号量隔离,换种说法:前者在新的线程中执行,后者是调用线程中执行。

  • 前者一个实例只能向调用程序发送单条结果数据;后者一个Observable, 其可以发送多条数据。

1
2
3
4
5
6
7
8
9
10
11
12
13
14
15
16
17
18
19
20
21
22
23
24
25
26
27
28
29
30
31
32
33
34
35
36
37
38
39
40
41
42
43
44
45
46
47
48
49
50
51
52
53
54
55
56
57
58
59
60
61
62
63
64
65
66
public class ObservableCommandHelloWorld extends HystrixObservableCommand<String> {
private final String name;
private final List<String> result;
public ObservableCommandHelloWorld(String name) {
super(HystrixCommandGroupKey.Factory.asKey("helloWorldGroup"));
result = Lists.newArrayList("step1", "step2", "step3");
this.name = name;
}
@Override
protected Observable<String> construct() {
System.out.println("Run the Command " + System.currentTimeMillis() + ", Thread Name : " +Thread.currentThread().getName());
return Observable.from(result);
}
public static class UnitTest {
@Test
public void testObservableCommand() {
Observable<String> obeservableCommand = new ObservableCommandHelloWorld("obeservableCommand").observe();
System.out.println("Run Immediately! ");
obeservableCommand.subscribe(new Action1<String>() {
@Override
public void call(String s) {
System.out.println("before: " + s);
}
});
System.out.println(" Arrive in the Step!");
obeservableCommand.subscribe(new Action1<String>() {
@Override
public void call(String s) {
System.out.println("after: " + s);
}
});
/*
Run the Command 1501472423353, Thread Name:main
Run Immediately!
before: step1
before: step2
before: step3
Arrive in the Step!
after: step1
after: step2
after: step3
*/
}

@Test
public void testToObservableCommand() {
Observable<String> obeservableCommand = new ObservableCommandHelloWorld("obeservableCommand").toObservable();
System.out.println(" Arrive in the Step!");
obeservableCommand.subscribe(new Action1<String>() {
@Override
public void call(String s) {
System.out.println(s);
}
});
System.out.println("Run be delayed, until the Subscribe");
/*
Arrive in the Step!
Run the Command 1501472423363, Thread Name : main
step1
step2
step3
Run be delayed, until the Subscribe
*/
}
}
}

3. fallback(降级)

降级是指在系统出现问题时,系统能提供一些备用的方法,常用的如返回一些默认的值或者执行一些降级逻辑。
Hystrix非常优雅地支持降级,只需要在命令类中添加降级方法getFallback()或者resumeWithFallback()。在主命令失败时,可以返回一些默认的结果。

1
2
3
4
@Override
protected String getFallback() {
return StringUtils.EMPTY;
}

针对ObservableCommandHelloWorld,我们可以添加降级逻辑如下:

1
2
3
4
@Override
protected Observable<String> resumeWithFallback() {
return Observable.empty();
}

当发生如下几种情况时,会调用降级逻辑:

  • HystrixBadRequestException异常,业务逻辑抛出的异常。对于HystrixBadRequestException,其可以被用来包装如参数非法或者非业务逻辑错误等异常,且其不会被记录到失败的度量数据中。
  • 业务逻辑超时异常;
  • 熔断器打开时;
  • 线程池满或者信号量满的情况会。

##4. 请求缓存
Hystrix支持在同一个上下文中缓存请求结果。当多次对相同key的资源请求时,只会在第一次发出请求,而后面的请求都会利用前面得到的结果。此处上下文可以是一次客户端的请求。只需要实现getCacheKey()方法即可。

1
2
3
4
5
6
7
8
9
10
11
12
13
14
15
16
17
18
19
20
21
22
23
24
25
26
27
28
29
30
31
32
33
34
35
36
37
38
39
40
41
42
43
44
45
46
47
48
public class CommandUsingRequestCache extends HystrixCommand<Boolean> {
private final int value;
private static final Setter setter = Setter.withGroupKey(HystrixCommandGroupKey.Factory.asKey("ExampleGroup")).
andCommandKey(HystrixCommandKey.Factory.asKey("commandUsingRequestCache"))
.andCommandPropertiesDefaults(HystrixCommandProperties.Setter()
.withExecutionIsolationStrategy(THREAD)
.withRequestCacheEnabled(true));//配置为开启请求缓存
protected CommandUsingRequestCache(int value) {
super(setter);
this.value = value;
}
@Override
protected Boolean run() {
return value == 0 || value % 2 == 0;
}
@Override
protected String getCacheKey() {
return String.valueOf(value);
}
public static class UnitTest {
@Test
public void testWithCacheHits() {
HystrixRequestContext context = HystrixRequestContext.initializeContext();
try {
CommandUsingRequestCache command2a = new CommandUsingRequestCache(2);
CommandUsingRequestCache command2b = new CommandUsingRequestCache(2);
//第一次发出请求
assertTrue(command2a.execute());
assertFalse(command2a.isResponseFromCache());
//第二次会直接从缓存中获取结果
assertTrue(command2b.execute());
assertTrue(command2b.isResponseFromCache());
} finally {
context.shutdown();
}
//开启一个新的上下文
context = HystrixRequestContext.initializeContext();
try {
CommandUsingRequestCache command3b = new CommandUsingRequestCache(2);
assertTrue(command3b.execute());
//此时会重新发送一次请求
assertFalse(command3b.isResponseFromCache());
} finally {
context.shutdown();
}
}
}
}

对于Web服务,我们可以在Filter中建立上下文,请求结束时,关闭上下文。

1
2
3
4
5
6
7
8
9
10
11
12
13
14
15
16
17
public class HystrixContextFilter implements Filter {
@Override
public void init(FilterConfig filterConfig) throws ServletException {
}
@Override
public void doFilter(ServletRequest servletRequest, ServletResponse servletResponse, FilterChain filterChain) throws IOException, ServletException {
HystrixRequestContext context = HystrixRequestContext.initializeContext();
try {
filterChain.doFilter(servletRequest, servletResponse);
}finally {
context.shutdown();
}
}
@Override
public void destroy() {
}
}

##4. 隔离策略
Hystrix应用舱壁模式来隔离依赖,限制对依赖的并发访问。
舱壁:货船为了进行防止漏水和火灾的扩散,会将货仓分隔为多个,当发生灾害时,将所在货仓进行隔离就可以降低整艘船的风险。

Hystrix 有两种隔离策略:线程隔离和信号量隔离

  • 线程隔离:每个外部依赖在隔离的线程中执行,将这些对外部以来的调用从调用线程中隔离开,从而不会影响调用者的整个流程。Hystrix底层通过为每个依赖建一个线程池的方式来达到当此依赖的线程池耗尽时不会影响其他依赖。(对于Netflix为什么会用线程和线程池来实现隔离,以及其好处和劣势,对于会引起性能损耗问题,官方也给出了实验结果:How-it-Works#Isolation
  • 信号量隔离:一般用来控制对给定依赖的并发请求数量。通过使用信号量的方式来控制负载。但是它不允许超时和非阻塞请求。如果足够信任客户端且仅仅想限制负载时,可以使用此方法。
    • HystrixCommandHystrixObservableCommand支持在两个地方实施信号量隔离:FallbackExecution

配置Command为信号隔离还是线程隔离:
以下为线程隔离的方式,同时可以设置线程池的属性

1
2
3
4
5
6
7
8
9
10
11
12
13
14
15
16
17
18
19
20
21
22
23
24
25
26
27
28
29
30
31
32
33
34
35
36
37
38
39
40
41
42
43
44
public class CommandUsingThreadsolation extends HystrixCommand<String> {
private final int id;
public CommandUsingThreadsolation(int id) {
super(Setter.withGroupKey(HystrixCommandGroupKey.Factory.asKey("ExampleGroup"))
.andCommandPropertiesDefaults(HystrixCommandProperties.Setter()
//THREAD : 线程隔离,SEMAPHORE : 信号量隔离
.withExecutionIsolationStrategy(ExecutionIsolationStrategy.THREAD))
.andThreadPoolPropertiesDefaults(HystrixThreadPoolProperties.Setter()
.withCoreSize(20)//默认10
.withMaximumSize(50)//默认10
.withMaxQueueSize(65535)//默认 -1
.withQueueSizeRejectionThreshold(200) //当队列数大于此时,抛异常
.withKeepAliveTimeMinutes(1)
.withMetricsRollingStatisticalWindowInMilliseconds(20000)
.withMetricsRollingStatisticalWindowBuckets(20)
)
);
this.id = id;
}
@Override
protected String run() {
return "ValueFromHashMap_" + id;
}
}
```
对于信号量,可以有如下配置属性:

```java
public class CommandUsingSemaphoreIsolation extends HystrixCommand<String> {
private final int id;
public CommandUsingSemaphoreIsolation(int id) {
super(Setter.withGroupKey(HystrixCommandGroupKey.Factory.asKey("ExampleGroup"))
.andCommandPropertiesDefaults(HystrixCommandProperties.Setter()
.withExecutionIsolationStrategy(ExecutionIsolationStrategy.SEMAPHORE)
.withExecutionIsolationSemaphoreMaxConcurrentRequests(20)//最大并发请求数
)
);
this.id = id;
}
@Override
protected String run() {
return "ValueFromHashMap_" + id;
}
}

5. 熔断机制

什么是熔断?

熔断是指:在因某些原因或者依赖使得系统出现过载现象时,为了防止其拖垮整个系统而采取的措施。当熔断开关打开时,系统将关闭对某一服务的请求,闭而走降级逻辑或向调用者抛错。

Hystrix 中实现了断路器的逻辑,并为每个 commandKey 标识的服务创建一个断路器。HystrixCommandHystrixObserableCommand将断路器作为其属性,作用在命令执行过程中。默认情况下,请求都会走熔断判断逻辑。当然可以强制关闭它 circuitBreaker.forceClosed=true,使熔断器失效;或者强制开启它 circuitBreaker.forceOpen=true,使得所有的请求都走降级逻辑。

断路器共有三个状态:OPENCLOSEHALF-OPEN

  • OPEN开启状态下,所有的请求都被降级;
  • CLOSE关闭状态下,请求都正常执行;
  • HALF-OPEN半开状态,断路器为开启状态一段时间后会放过一个请求:如果这个请求失败则将断路器依然为OPEN状态,成功则将管路器设置为CLOSE状态。

先来简单看下Hystrix中断路器是怎么起作用的:

命令执行结果统计:

命令执行完成后,会生成很多计量信息(命令执行结果类型,比如:一段时间内,命令执行成功、失败、超时以及被拒绝的数量)。
这些度量信息是怎么记录的:Hystrix使用滑动窗口的方式来保存度量数据,它只会保存最近rollingStats.timeInMilliseconds段时间内的所有命令执行结果信息,并且为了更好地使用它们,会将整个时间段的度量分为rollingStats.numBuckets个桶来保存。
断路器执行时,会根据这些数据来计算错误率供断路器使用

断路器的CLOSE状态向OPEN状态转换时,需要满足以下条件:

  1. 滑动窗口周期内的总请求数量大于阈值HystrixCommandProperties.circuitBreakerRequestVolumeThreshold()
  2. 滑动窗口周期内请求错误率超过设置的阈值HystrixCommandProperties.circuitBreakerErrorThresholdPercentage()

断路器由OPENHALF-OPENCLOSE转换时,需要满足一下条件:
在断路器开启HystrixCommandProperties.circuitBreakerSleepWindowInMilliseconds()ms后,会放过一个请求,此时断路器状态更改为HALF-OPEN状态,此请求成功时,则由HALF-OPEN状态转向CLOSE

配置示例如下:

1
2
3
4
5
6
7
8
9
10
11
12
13
14
15
16
17
18
19
20
21
public class CommandUsingCircuitBreaker extends HystrixCommand<String> {
private final int id;
public CommandUsingCircuitBreaker(int id) {
super(Setter.withGroupKey(HystrixCommandGroupKey.Factory.asKey("ExampleGroup"))
.andCommandPropertiesDefaults(HystrixCommandProperties.Setter()
.withExecutionIsolationStrategy(ExecutionIsolationStrategy.THREAD)
.withCircuitBreakerEnabled(true)// 熔断器
.withCircuitBreakerRequestVolumeThreshold(20) //熔断器起作用的请求数量阈值
.withCircuitBreakerSleepWindowInMilliseconds(500)//休眠时间
.withCircuitBreakerErrorThresholdPercentage(50)//断路器打开的错误率边界
.withCircuitBreakerForceClosed(false)
.withCircuitBreakerForceOpen(false)
)
);
this.id = id;
}
@Override
protected String run() {
return "ValueFromHashMap_" + id;
}
}

7. 请求合并(HystrixCollapser)

HystrixCollapser 用于将多个请求合并成一个请求发出。
将多个请求合并成一个请求的好处是:它可以减少线程的数量和网络连接的数量,减少系统代价。HystrixCollapser使用全自动的方式来实现合并请求,而不需要开发人员以硬编码的形式来收工支持批量请求。
但是它也是有一定的代价:它需要等待一个窗口期(timerDelayInMilliseconds 默认10ms)来接受批量请求,然后将请求批量发送。

因此对于时延较低的服务不推荐使用此方法。

1
2
3
4
5
6
7
8
9
10
11
12
13
14
15
16
17
18
19
20
21
22
23
24
25
26
27
28
29
30
31
32
33
34
35
36
37
38
39
40
41
42
43
44
45
public class CommandCollapserGetValueForKey extends HystrixCollapser<List<String>, String, Integer> {
private final Integer key;
private static final Setter setter = Setter.withCollapserKey(HystrixCollapserKey.Factory.asKey("commandCollapserGetValueForKey"))
.andCollapserPropertiesDefaults(HystrixCollapserProperties.Setter()
.withMaxRequestsInBatch(20)//最大的批量请求数
.withTimerDelayInMilliseconds(5)
//延迟等待时间
.withRequestCacheEnabled(true)
).andScope(Scope.REQUEST);
public CommandCollapserGetValueForKey(Integer key) {
super(setter);
this.key = key;
}
@Override
public Integer getRequestArgument() {
return key;
}
@Override
protected HystrixCommand<List<String>> createCommand(final Collection<CollapsedRequest<String, Integer>> requests) {
return new BatchCommand(requests);
}
@Override
protected void mapResponseToRequests(List<String> batchResponse, Collection<CollapsedRequest<String, Integer>> requests) {
int count = 0;
for (CollapsedRequest<String, Integer> request : requests) {
request.setResponse(batchResponse.get(count++));
}
}
private static final class BatchCommand extends HystrixCommand<List<String>> {
private final Collection<CollapsedRequest<String, Integer>> requests;
private BatchCommand(Collection<CollapsedRequest<String, Integer>> requests) { super(Setter.withGroupKey(HystrixCommandGroupKey.Factory.asKey("ExampleGroup"))
.andCommandKey(HystrixCommandKey.Factory.asKey("GetValueForKey")));
this.requests = requests;
}

@Override
protected List<String> run() {
ArrayList<String> response = new ArrayList<String>();
for (CollapsedRequest<String, Integer> request : requests) {
response.add("ValueForKey: " + request.getArgument());
}
return response;
}
}
}

对于更详细的配置信息,可以参考官方文档

注解使用

Java相对于其他语言有个比较大的优势是反射和注解。几乎所有的框架(Spring、MyBatis等)都将注解应用到了极致。上面的示范也展现了接入Hystrix需要做很多硬编码工作,且对代码具有较大的侵入性。因此开源社区的贡献者就开发了Hystrix的注解接入方式(hystrix-javanica),旨在帮助开发人员提高接入效率。

首先,因为它不是官方的核心功能,所以需要另外导入依赖。

1
2
3
4
5
<dependency>
<groupId>com.netflix.hystrix</groupId>
<artifactId>hystrix-javanica</artifactId>
<version>${hystrix.version}</version>
</dependency>

其次,hystrix-javanica中使用AspectJ来实施切面功能。所以需要进行如下配置:

1
2
<aop:aspectj-autoproxy proxy-target-class="true" />
<bean id="hystrixAspect" class="com.netflix.hystrix.contrib.javanica.aop.aspectj.HystrixCommandAspect"></bean>

使用方式:

同步方式:

1
2
3
4
5
6
7
8
9
10
11
12
13
public class UserService {
//groupKey默认会取Class Name,commandKey默认会取方法的名称
@HystrixCommand(groupKey="UserGroup", commandKey = "getUserById",
//设置命令参数,更多参数见”HystrixPropertiesManager“
commandProperties = {
@HystrixProperty(name = "execution.isolation.strategy", value = "THREAD"),
@HystrixProperty(name = "execution.isolation.thread.timeoutInMilliseconds", value = "500"),
}
)
public User getUserById(String id) {
return userResource.getUserById(id);
}
}

异步方式:

1
2
3
4
5
6
7
8
9
@HystrixCommand(groupKey="UserGroup", commandKey = "GetUserByIdCommand")
public Future<User> getUserByIdAsync(final String id) {
return new AsyncResult<User>() {
@Override
public User invoke() {
return userResource.getUserById(id);
}
};
}

Fallback

1
2
3
4
5
6
7
8
@HystrixCommand(fallbackMethod = "defaultUser")
public User getUserById(String id) {
return userResource.getUserById(id);
}

private User defaultUser(String id) {
return new User("def", "def");
}

Hystrix Collapser

1
2
3
4
5
6
7
8
9
10
11
12
13
14
/** Asynchronous Execution */
@HystrixCollapser(batchMethod = "getUserByIds")
public Future<User> getUserByIdAsync(String id) {
return null;
}

@HystrixCommand
public List<User> getUserByIds(List<String> ids) {
List<User> users = new ArrayList<User>();
for (String id : ids) {
users.add(new User(id, "name: " + id));
}
return users;
}

动态配置

Hystrix默认就支持动态配置,在运行时改变参数。Hystrix的配置是用Archaius来实现。
它支持以特定的时间周期来执行配置拉取和替换,使用它的动态配置只需要实现PolledConfigurationSource接口,并在其中实现配置拉取的逻辑即可。
如下,每3000秒一次拉取一次更新的配置:

1
2
3
4
5
6
7
8
9
10
11
12
13
14
15
public class HystrixDynamicConfigurationManager implements InitializingBean {

@Resource
private MtConfigClient mtConfigClient;

@Override
public void afterPropertiesSet() throws Exception {
AbstractConfiguration configInstance = ConfigurationManager.getConfigInstance();
AbstractPollingScheduler scheduler = new FixedDelayPollingScheduler(0, 3000, true);
PolledConfigurationSource source = new MtPoolConfigSource(mtConfigClient, "hystrixConfig");
scheduler.setIgnoreDeletesFromSource(true);
scheduler.startPolling(source, configInstance);
ConfigurationManager.install(configInstance);
}
}

Dashboard

Hystrix可以做到实时地监控命令的度量信息,观察命令的执行情况。

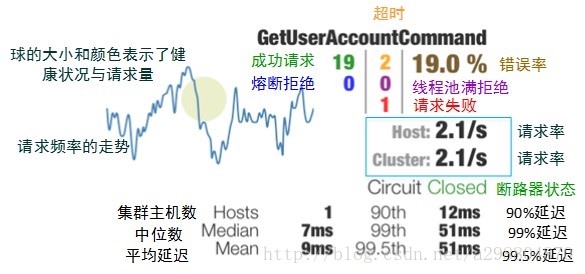
通过实时观察这些信息,我们可以做实时调整设置(如超时时间等)、观察到系统的运行情况:延时、超时数量、断路器是否打开等,当系统出现故障时可以第一时间做出应对。

接入Dashboard我们需要两步走:
第一步:将系统的度量数据输出。Hystrix社区已有贡献者开发了相关功能,我们只需要引入如下依赖并在在web.xml中插入相应Servlet即可在浏览器中

1
2
3
4
5
6
7
8
9
10
11
12
13
14
15
<dependency>
<groupId>com.netflix.hystrix</groupId>
<artifactId>hystrix-metrics-event-stream</artifactId>
<version>${hystrix-metrics-event-stream.version}</version>
</dependency>
---------------------------------------------------
<servlet>
<servlet-name>HystrixMetricsStreamServlet</servlet-name>
<servlet-class> com.netflix.hystrix.contrib.metrics.eventstream.HystrixMetricsStreamServlet</servlet-class>
</servlet>

<servlet-mapping>
<servlet-name>HystrixMetricsStreamServlet</servlet-name>
<url-pattern>/hystrix.stream</url-pattern>
</servlet-mapping>

以下为其输出的信息:

1
2
3
4
5
6
7
8
ping:

data: {"type":"HystrixCommand","name":"phoneQueryKey","group":"elasticSearchGroupKey","currentTime":1501553293752,"isCircuitBreakerOpen":false,"errorPercentage":0,"errorCount":0,"requestCount":0,"rollingCountBadRequests":0,"rollingCountCollapsedRequests":0,"rollingCountEmit":0,"rollingCountExceptionsThrown":0,"rollingCountFailure":0,"rollingCountFallbackEmit":0,"rollingCountFallbackFailure":0,"rollingCountFallbackMissing":0,"rollingCountFallbackRejection":0,"rollingCountFallbackSuccess":0,"rollingCountResponsesFromCache":0,"rollingCountSemaphoreRejected":0,"rollingCountShortCircuited":0,"rollingCountSuccess":0,"rollingCountThreadPoolRejected":0,"rollingCountTimeout":0,"currentConcurrentExecutionCount":0,"rollingMaxConcurrentExecutionCount":0,"latencyExecute_mean":0,"latencyExecute":{"0":0,"25":0,"50":0,"75":0,"90":0,"95":0,"99":0,"99.5":0,"100":0},"latencyTotal_mean":0,"latencyTotal":{"0":0,"25":0,"50":0,"75":0,"90":0,"95":0,"99":0,"99.5":0,"100":0},"propertyValue_circuitBreakerRequestVolumeThreshold":20,"propertyValue_circuitBreakerSleepWindowInMilliseconds":5000,"propertyValue_circuitBreakerErrorThresholdPercentage":50,"propertyValue_circuitBreakerForceOpen":false,"propertyValue_circuitBreakerForceClosed":false,"propertyValue_circuitBreakerEnabled":true,"propertyValue_executionIsolationStrategy":"SEMAPHORE","propertyValue_executionIsolationThreadTimeoutInMilliseconds":5000,"propertyValue_executionTimeoutInMilliseconds":5000,"propertyValue_executionIsolationThreadInterruptOnTimeout":true,"propertyValue_executionIsolationThreadPoolKeyOverride":null,"propertyValue_executionIsolationSemaphoreMaxConcurrentRequests":50,"propertyValue_fallbackIsolationSemaphoreMaxConcurrentRequests":50,"propertyValue_metricsRollingStatisticalWindowInMilliseconds":10000,"propertyValue_requestCacheEnabled":true,"propertyValue_requestLogEnabled":true,"reportingHosts":1,"threadPool":"elasticSearchGroupKey"}

data: {"type":"HystrixCommand","name":"cinemaInfoQueryKey","group":"CinemaManagerGroupKey","currentTime":1501553293752,"isCircuitBreakerOpen":false,"errorPercentage":0,"errorCount":0,"requestCount":0,"rollingCountBadRequests":0,"rollingCountCollapsedRequests":0,"rollingCountEmit":0,"rollingCountExceptionsThrown":0,"rollingCountFailure":0,"rollingCountFallbackEmit":0,"rollingCountFallbackFailure":0,"rollingCountFallbackMissing":0,"rollingCountFallbackRejection":0,"rollingCountFallbackSuccess":0,"rollingCountResponsesFromCache":0,"rollingCountSemaphoreRejected":0,"rollingCountShortCircuited":0,"rollingCountSuccess":0,"rollingCountThreadPoolRejected":0,"rollingCountTimeout":0,"currentConcurrentExecutionCount":0,"rollingMaxConcurrentExecutionCount":0,"latencyExecute_mean":0,"latencyExecute":{"0":0,"25":0,"50":0,"75":0,"90":0,"95":0,"99":0,"99.5":0,"100":0},"latencyTotal_mean":0,"latencyTotal":{"0":0,"25":0,"50":0,"75":0,"90":0,"95":0,"99":0,"99.5":0,"100":0},"propertyValue_circuitBreakerRequestVolumeThreshold":20,"propertyValue_circuitBreakerSleepWindowInMilliseconds":5000,"propertyValue_circuitBreakerErrorThresholdPercentage":50,"propertyValue_circuitBreakerForceOpen":false,"propertyValue_circuitBreakerForceClosed":false,"propertyValue_circuitBreakerEnabled":true,"propertyValue_executionIsolationStrategy":"THREAD","propertyValue_executionIsolationThreadTimeoutInMilliseconds":1000,"propertyValue_executionTimeoutInMilliseconds":1000,"propertyValue_executionIsolationThreadInterruptOnTimeout":true,"propertyValue_executionIsolationThreadPoolKeyOverride":null,"propertyValue_executionIsolationSemaphoreMaxConcurrentRequests":10,"propertyValue_fallbackIsolationSemaphoreMaxConcurrentRequests":10,"propertyValue_metricsRollingStatisticalWindowInMilliseconds":10000,"propertyValue_requestCacheEnabled":true,"propertyValue_requestLogEnabled":true,"reportingHosts":1,"threadPool":"CinemaManagerGroupKey"}

data: {"type":"HystrixCommand","name":"wrapOrderModelKey","group":"asyncOrderWrapperGroupKey","currentTime":1501553293752,"isCircuitBreakerOpen":false,"errorPercentage":0,"errorCount":0,"requestCount":0,"rollingCountBadRequests":0,"rollingCountCollapsedRequests":0,"rollingCountEmit":0,"rollingCountExceptionsThrown":0,"rollingCountFailure":0,"rollingCountFallbackEmit":0,"rollingCountFallbackFailure":0,"rollingCountFallbackMissing":0,"rollingCountFallbackRejection":0,"rollingCountFallbackSuccess":0,"rollingCountResponsesFromCache":0,"rollingCountSemaphoreRejected":0,"rollingCountShortCircuited":0,"rollingCountSuccess":0,"rollingCountThreadPoolRejected":0,"rollingCountTimeout":0,"currentConcurrentExecutionCount":0,"rollingMaxConcurrentExecutionCount":0,"latencyExecute_mean":0,"latencyExecute":{"0":0,"25":0,"50":0,"75":0,"90":0,"95":0,"99":0,"99.5":0,"100":0},"latencyTotal_mean":0,"latencyTotal":{"0":0,"25":0,"50":0,"75":0,"90":0,"95":0,"99":0,"99.5":0,"100":0},"propertyValue_circuitBreakerRequestVolumeThreshold":20,"propertyValue_circuitBreakerSleepWindowInMilliseconds":5000,"propertyValue_circuitBreakerErrorThresholdPercentage":50,"propertyValue_circuitBreakerForceOpen":false,"propertyValue_circuitBreakerForceClosed":false,"propertyValue_circuitBreakerEnabled":true,"propertyValue_executionIsolationStrategy":"THREAD","propertyValue_executionIsolationThreadTimeoutInMilliseconds":20000,"propertyValue_executionTimeoutInMilliseconds":20000,"propertyValue_executionIsolationThreadInterruptOnTimeout":true,"propertyValue_executionIsolationThreadPoolKeyOverride":null,"propertyValue_executionIsolationSemaphoreMaxConcurrentRequests":10,"propertyValue_fallbackIsolationSemaphoreMaxConcurrentRequests":10,"propertyValue_metricsRollingStatisticalWindowInMilliseconds":10000,"propertyValue_requestCacheEnabled":true,"propertyValue_requestLogEnabled":true,"reportingHosts":1,"threadPool":"asyncOrderWrapperGroupKey"}
...

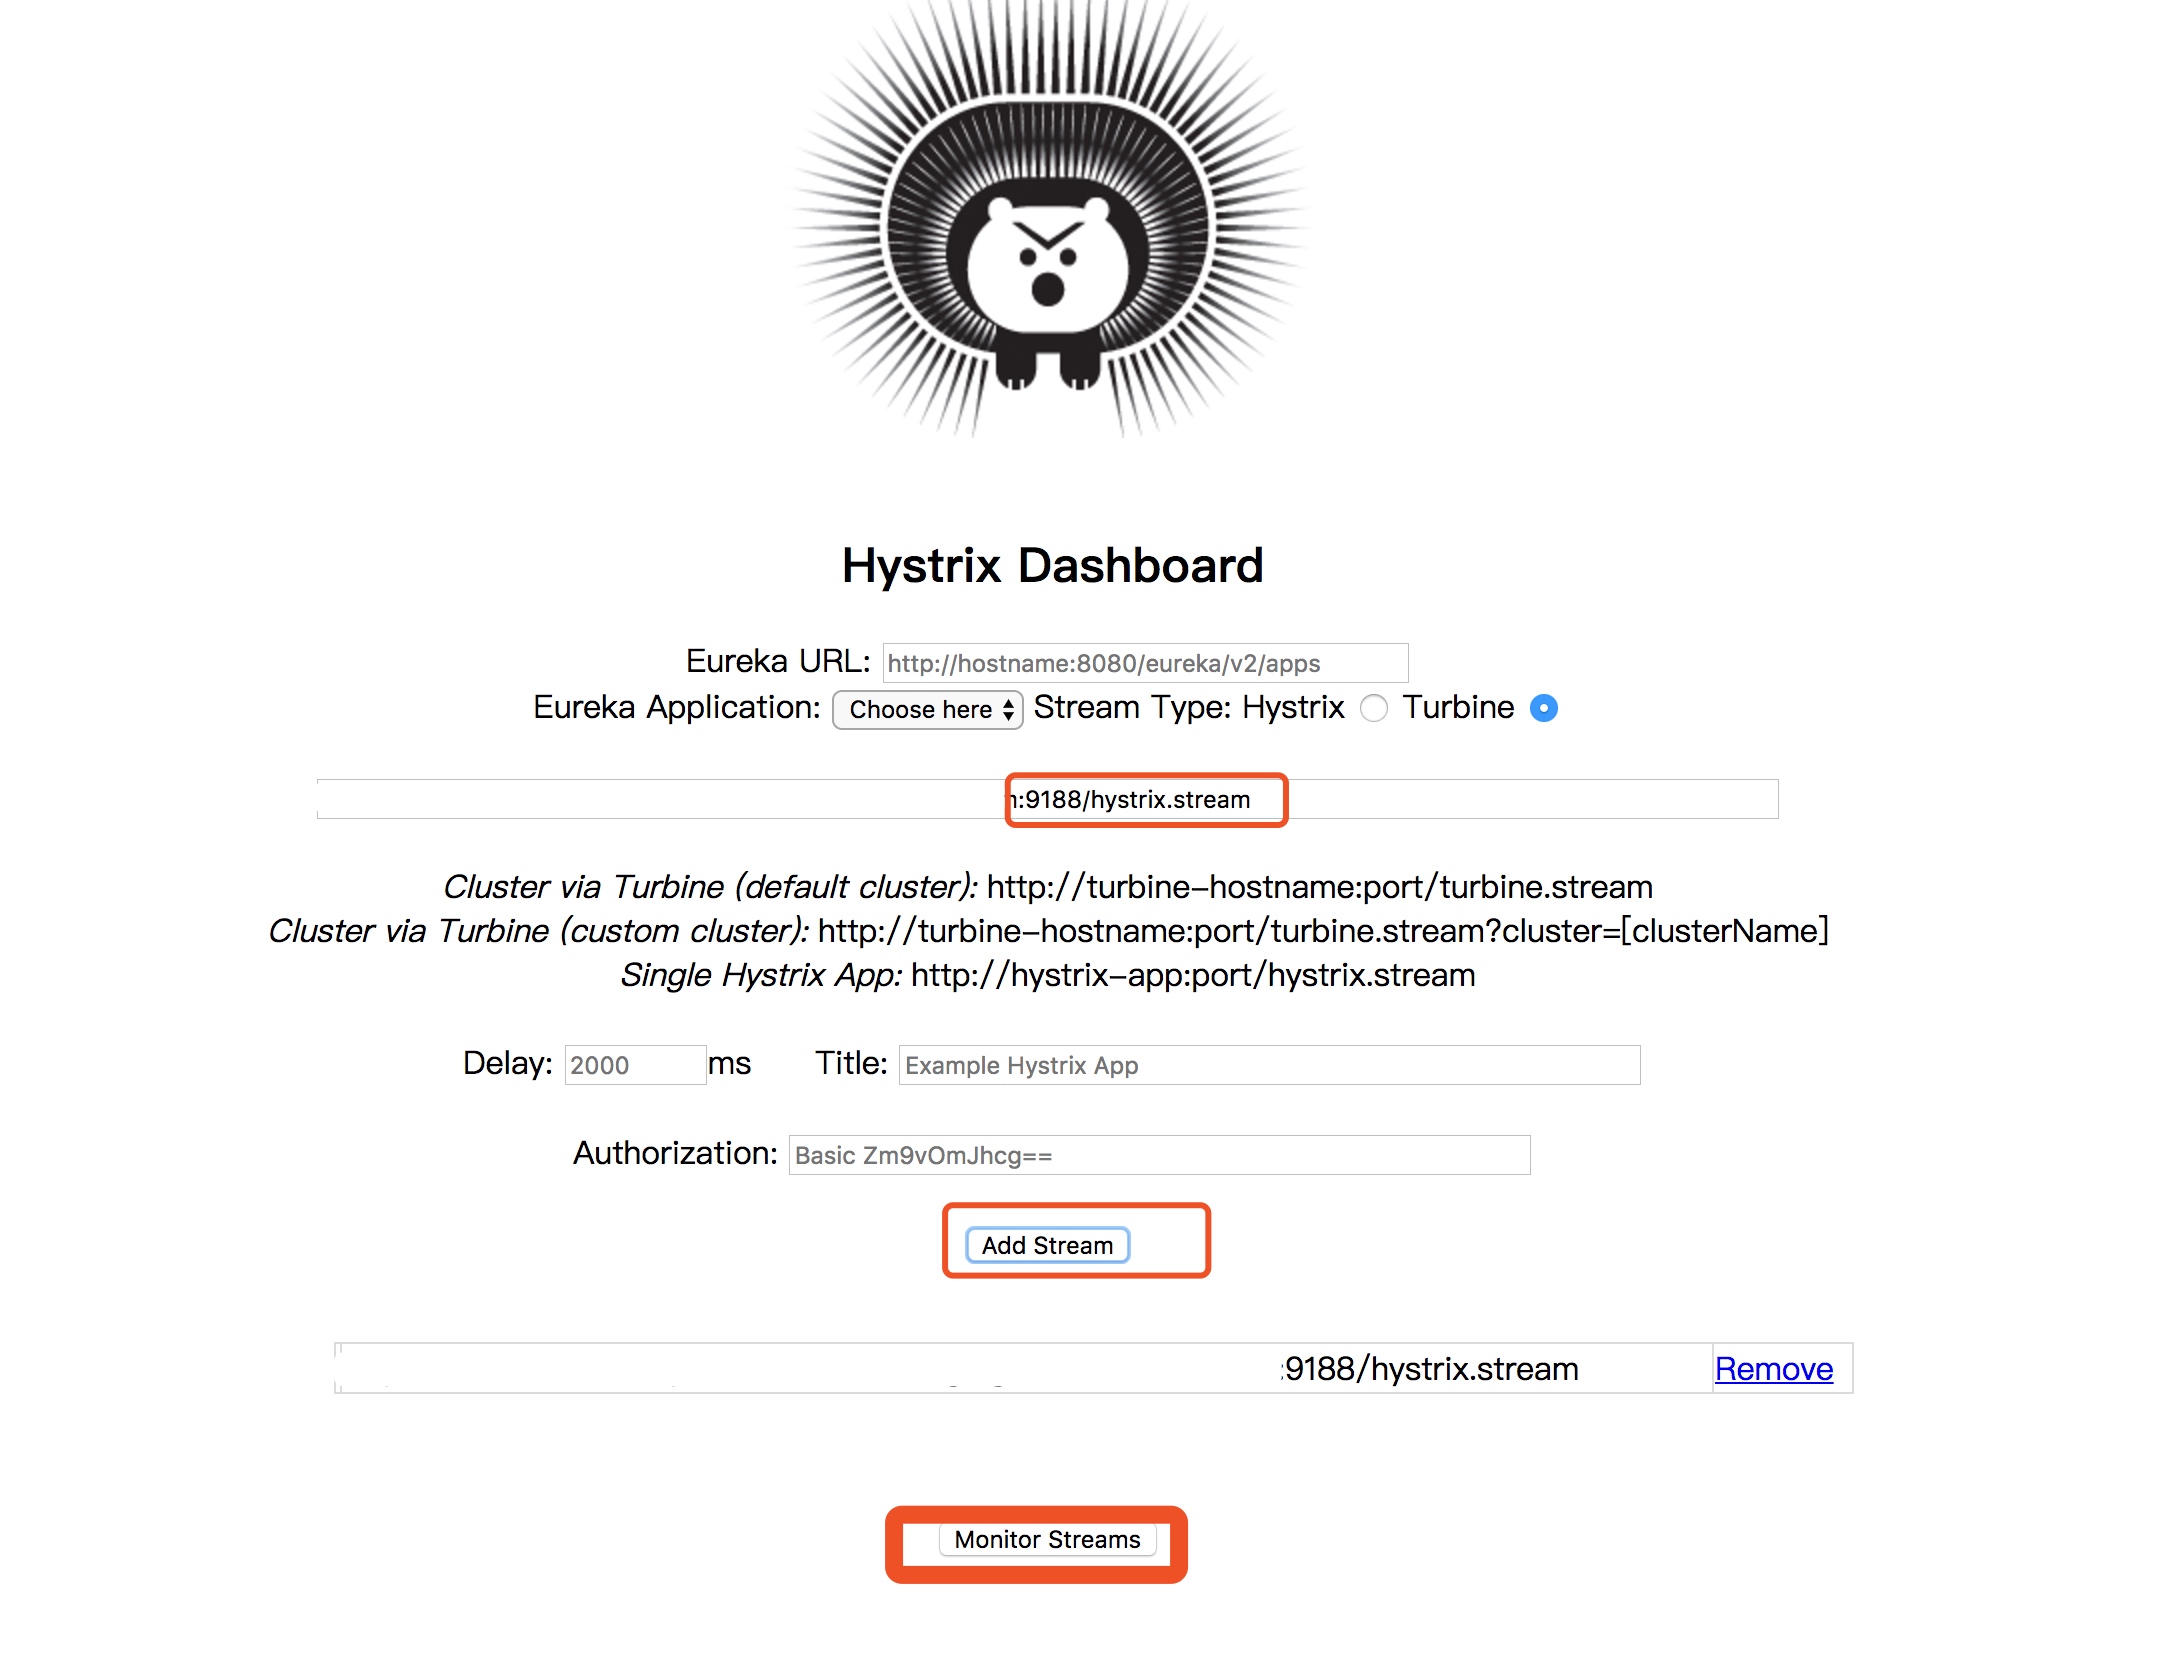
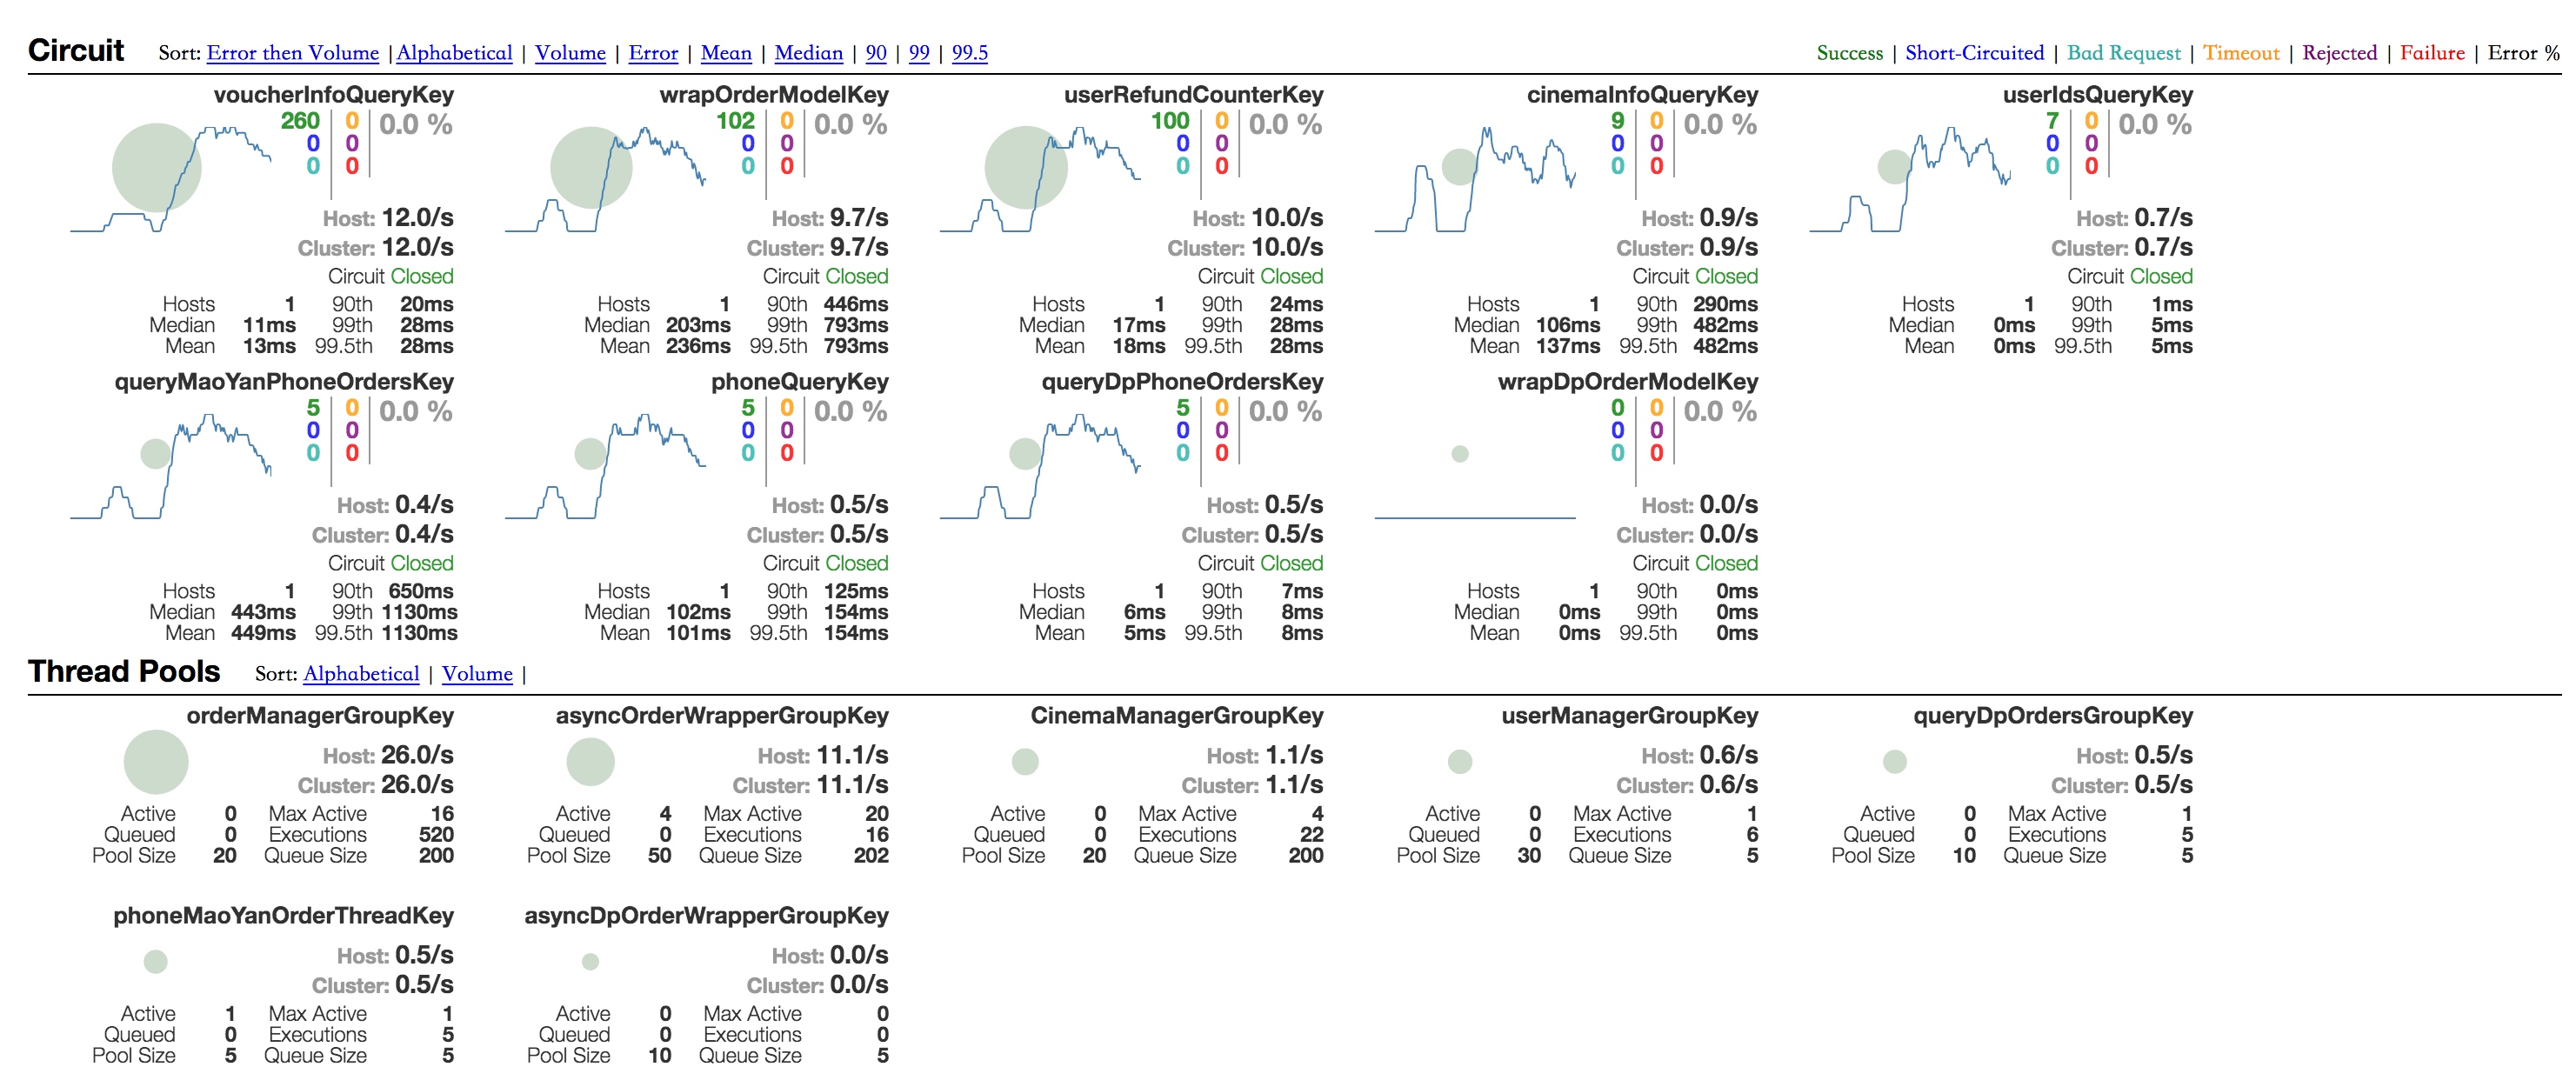
第二步:运行Turbine,使用Turbine将信息聚合并以实时图表的形式展现出来。Hystrix官方也给出了安装指导信息

参考:

Hystrix Wiki
1. How-to-use
2. DashBoard
3. Hystrix使用入门手册

Archaius

您的支持是我创作源源不断的动力