Log4j2源码解析

Log4j2 源码浅析

[TOC]

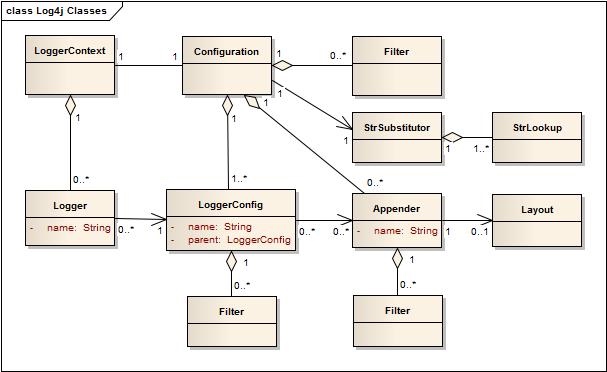
介绍Log4j2的原理之前,回顾下之前配置文件中提到的几个概念:Configuration、LoggerConfig、Logger、Appender、Layout、Filter。Log4j2的官网上给出了类图,能清晰地看清楚它们之间的关联。
从图中可以看出LoggerContext、Configuration是一对一的关系,在一般的应用中通常也都只存在一个实例(Share one ClassLoader(Standalone Application、Web Application、Java EE Applications、”Shared” Web Applications and REST Service Containers),Not OSGi Applications Logging Separation)。

  1. LoggerContext: 整个日志系统的锚点(承载全局日志上下文信息),类似于Spring的WebApplicationContext
  2. Configuration: 全局配置信息,每个LoggerContext对应一个Configuration
  3. Appender: 追加器,对应配置文件中的<Appenders>下定义的Appender,定义日志输出位置以及日志输出格式,。用户可以自定义Appender,只需继承AbstractAppender并实现append(LogEvent)方法。
    • Layout: 定义日志的输出格式
  4. Filter: 过滤器,在整个日志系统的类图中,多个地方应用。起到一个过滤的作用,用于过滤特定日志级别的日志事件。有多个地方引用Filter:日志事件进入LoggerConfig之前;进入LoggerConfig后调用任何Appender之前;进入LoggerConfig后调用特殊的Appender之前;每个Appender内部。
  5. LoggerConfig: 真正的日志操作实体,对应配置文件中的<Logger>下定义的Logger。含有全局唯一标识(名称),一般对应的是一个包目录名称。
  6. Logger: 壳,每个Logger内部都对应一个LoggerConfig(通过名称来对应)。对日志事件的操作,都交由其对应的LoggerConfig进行处理
    set up-w666
  • 在使用日志系统前,首先需要初始化日志系统:解析日志配置信息Configuration,建立日志上下文LoggerContext(属性、Appender、LogerConfig…)
  • 给定name获取日志对象Logger时,LoggerContext结合上下文信息,返回一个绑定了特定名称的LoggerConfigLoger
  • 在执行日志操作时,会经过多层过滤(Filter),并且真正的日志操作由LoggerConfig来处理。

因此下面,将从这三方面来分析日志系统。1. 日志系统的初始化;2.获取日志对象;3.日志操作过程。其中,日志系统的初始化较其他两部分稍复杂。

1. 日志系统的初始化过程,获取LoggerContext

初始化的过程关键是 加载并解析配置文件,建立日志上下文。
初始化过程的时序图:
log初始化时序图

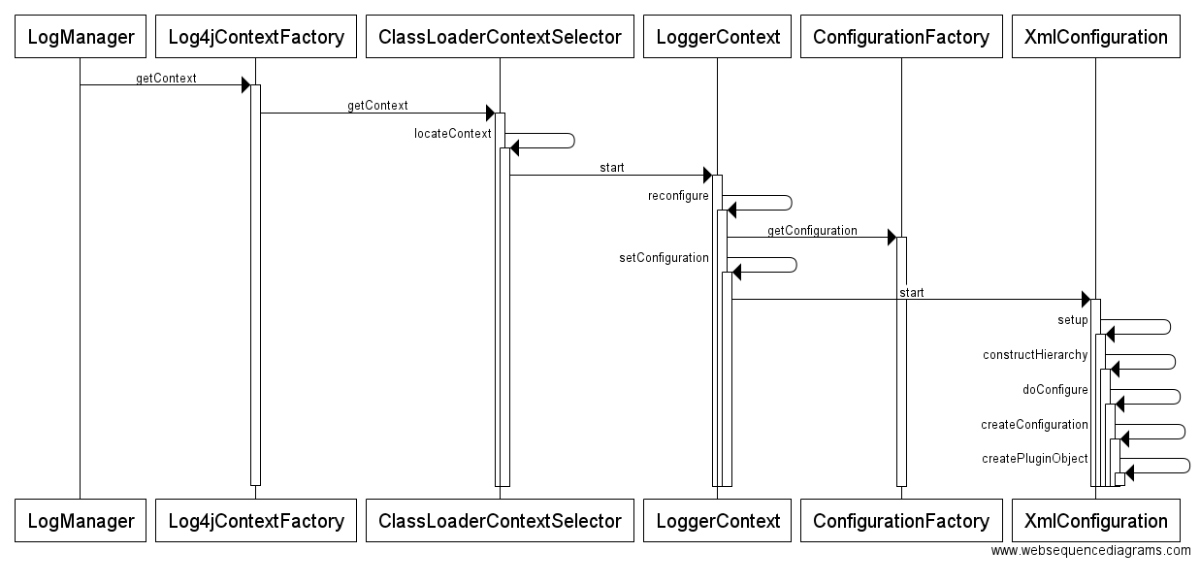
当应用首次调动LogManager.getLogger方法时,触发日志系统的初始化:

1
2
3
4
5
public static Logger getLogger(final Class<?> clazz) {
...
//获取LoggerContext,通过其获取指定类名称的Logger
return getContext(clazz.getClassLoader(), false).getLogger(clazz.getName());
}

getContext方法是建立日志系统上下文的起点。LogManager在类初始化时,会初始化一个生成LogerContext工厂,用户可以指定这个工厂,默认情况下为Log4jContextFactory。下文我们以Log4jContextFactory为主线来分析,其他情况类似。

1
2
3
4
5
public static LoggerContext getContext(final ClassLoader loader, final boolean currentContext) {
//factory为LoggerContextFactory接口的实现类,获取LoggerContext的工厂,
//而fatory的真正类型的初始化是在LogerManager的静态语句中进行。这里我们主要关注Log4jContextFactory
return factory.getContext(FQCN, loader, null, currentContext);
}

在初始化Log4jContextFactory工厂对象时,同时会实例化一个实现ContextSelector(用于定位LogerContext)接口的日志上下文选择器。同样,用户可以指定这个选择器(属性配置:Log4jContextSelector);默认为ClassLoaderContextSelector(前面一节提到的全异步化是将ClassLoaderContextSelector设置为AsyncLoggerContextSelector)。下文同样以ClassLoaderContextSelector为例。

进一步,Log4jContextFactory会调动ClassLoaderContextSelectorgetContext方法来获取LoggerContext,然后调用LoggerContext的start方法进行日志系统的初始化(核心部分):

1
2
3
4
5
6
7
8
9
10
11
public LoggerContext getContext(final String fqcn, final ClassLoader loader, final Object externalContext,final boolean currentContext) {
//实例化LoggerContext
final LoggerContext ctx = selector.getContext(fqcn, loader, currentContext);
if (externalContext != null && ctx.getExternalContext() == null) {
ctx.setExternalContext(externalContext);
}
if (ctx.getState() == LifeCycle.State.INITIALIZED) {
ctx.start();
}
return ctx;
}

可以看出,首先会拿ClassLoader去缓存中拿,如果有则直接返回,没有则创建一个。
因为是根据ClassLoader来进行缓存LoggerContext,所以对于同一个应用来说其所有的日志对象对应同一个LoggerContext。

1
2
3
4
5
6
7
8
9
10
11
12
13
14
15
16
17
18
19
20
21
22
23
24
25
26
27
28
29
30
31
private LoggerContext locateContext(final ClassLoader loaderOrNull, final URI configLocation) {
final ClassLoader loader = loaderOrNull != null ? loaderOrNull : ClassLoader.getSystemClassLoader();
final String name = toContextMapKey(loader);
//此处,首先会从CONTEXT_MAP中查看指定类型ClassLoader的LoggerContext是否已经存在,
//若存在则直接返回,这里也能看到为什么OSGI每个Budle有不同的日志系统。
AtomicReference<WeakReference<LoggerContext>> ref = CONTEXT_MAP.get(name);
if (ref == null) {
if (configLocation == null) {
ClassLoader parent = loader.getParent();
while (parent != null) {
ref = CONTEXT_MAP.get(toContextMapKey(parent));
if (ref != null) {
final WeakReference<LoggerContext> r = ref.get();
final LoggerContext ctx = r.get();
if (ctx != null) {
return ctx;
}
}
parent = parent.getParent();
}
}
//实例化一个LoggerContext,并将LoggerContext放进CONTEXT_MAP中
LoggerContext ctx = createContext(name, configLocation);
final AtomicReference<WeakReference<LoggerContext>> r = new AtomicReference<>();
r.set(new WeakReference<>(ctx));
CONTEXT_MAP.putIfAbsent(name, r);
ctx = CONTEXT_MAP.get(name).get().get();
return ctx;
}
...
}

LoggerContext的初始化方法start会间接调用reconfigure(URI) (start() -> reconfigure() -> reconfigure(URI)),其是加载并解析配置文件的核心内容

1
2
3
4
5
6
7
private void reconfigure(final URI configURI) {
final ClassLoader cl = ClassLoader.class.isInstance(externalContext) ? (ClassLoader) externalContext : null;
//通过配置工厂生成配置类
final Configuration instance = ConfigurationFactory.getInstance().getConfiguration(name, configURI, cl);
//对Configuration中的树形结构数据进行解析成对象,然后设置到LogerContext中
setConfiguration(instance);
}

其主要内容如下:

  1. 首先获取所有可用的配置工厂(ConfigurationFactory),然后根据应用中有的的配置文件类型(yml|json|xml)来适配一种配置对象生成工厂,通过工厂对象生成相应的配置对象。下面将以XMLConfigurationFactory为例,来介绍XMLConfiguration的生成和文件解析过程。其他两种(YamlConfigurationFactory,JsonConfigurationFactory)类似。
    • 在生成XMLConfiguration的同时,也会利用XML解析器将配置文件解析成Document类型,便于后面解析。
  2. setConfiguration(instance)是将Xml文档对象解析成真正的日志对象的主要过程。其调用start方法来完成解析的整个过程。

解析的过程分两步:1.setup利用XML文档对象构建起Node配置信息结构树(带有XML标签对应的插件类型信息); 2.doConfigure利用Node配置信息结构树,进一步完成从插件对象到实体对象的转换。

1
2
3
4
5
6
7
8
9
10
11
public void start() {
this.setStarting();
...
//通过递归的方式将XMl的标签元素转换成Node(插件类)
setup();
setupAdvertisement();
//通过反射的形式将带插件类型的Node转换成真正的类型并实例化相应的对象,并设置到XMlConfiguration属性中
doConfigure();
...
super.start();
}

setup方法通过递归调用constructHierarchy完成从XML标签元素到Node的转换,Node中最重要的属性是PluginType信息,它是配置文件Tag标签对应的插件类。(pluginManager是啥?为啥能根据tag标签名获取插件类型?留到最后讲解

<Console>标签为例,它的插件类型为ConsoleAppender

1
2
3
4
5
6
7
8
9
10
11
12
13
14
15
16
17
18
19
20
21
22
23
24
25
26
27
28
29
30
31
32
33
34
35
36
37
38
39
40
41
public void setup() {
...
constructHierarchy(rootNode, rootElement);
...
}
private void constructHierarchy(final Node node, final Element element) {
processAttributes(node, element);
final StringBuilder buffer = new StringBuilder();
final NodeList list = element.getChildNodes();
final List<Node> children = node.getChildren();
for (int i = 0; i < list.getLength(); i++) {
final org.w3c.dom.Node w3cNode = list.item(i);
if (w3cNode instanceof Element) {
final Element child = (Element) w3cNode;
//获取元素的名称,并通过名称获取对应的插件类信息,构建与配置文件结构一一对应的Node树结构。
//如上一届的Console,它的插件类型为ConsoleAppender
final String name = getType(child);
final PluginType<?> type = pluginManager.getPluginType(name);
final Node childNode = new Node(node, name, type);
//递归 DFS
constructHierarchy(childNode, child);
if (type == null) {
final String value = childNode.getValue();
if (!childNode.hasChildren() && value != null) {
node.getAttributes().put(name, value);
} else {
status.add(new Status(name, element, ErrorType.CLASS_NOT_FOUND));
}
} else {
children.add(childNode);
}
} else if (w3cNode instanceof Text) {
final Text data = (Text) w3cNode;
buffer.append(data.getData());
}
}
final String text = buffer.toString().trim();
if (text.length() > 0 || (!node.hasChildren() && !node.isRoot())) {
node.setValue(text);
}
}

doConfigure 递归执行createConfiguration方法,其通过插件类信息构建日志对象(AppenderLogerConfigFilter)。创建完日志成员对象后,会进一步建立他们之间的联系。最后对于LogerConfig会构建起其层次结构。

1
2
3
4
5
6
7
8
9
10
11
12
13
14
15
16
17
18
19
20
21
22
23
24
25
26
27
28
29
30
31
32
33
34
35
36
37
38
39
40
protected void doConfigure() {
...
boolean setLoggers = false;
boolean setRoot = false;
for (final Node child : rootNode.getChildren()) {
...
//关键!!
createConfiguration(child, null);
if (child.getObject() == null) {
continue;
}
if (child.getName().equalsIgnoreCase("Appenders")) {
appenders = child.getObject();
} else if (child.isInstanceOf(Filter.class)) {
addFilter(child.getObject(Filter.class));
} else if (child.getName().equalsIgnoreCase("Loggers")) {
final Loggers l = child.getObject();
loggers = l.getMap();
setLoggers = true;
if (l.getRoot() != null) {
root = l.getRoot();
setRoot = true;
}
}...
}
// 建立起 LogerConfig与Appender之间的引用关系
for (final Map.Entry<String, LoggerConfig> entry : loggers.entrySet()) {
final LoggerConfig l = entry.getValue();
for (final AppenderRef ref : l.getAppenderRefs()) {
final Appender app = appenders.get(ref.getRef());
if (app != null) {
l.addAppender(app, ref.getLevel(), ref.getFilter());
} else {
LOGGER.error("Unable to locate appender {} for logger {}", ref.getRef(), l.getName());
}
}
}
// 构建起LogerConfig之间的父子关系(通过name)
setParents();
}

createConfiguration会调动createPluginObject(type, node, event)方法来生成对象

1
2
3
4
5
6
7
8
9
10
11
12
13
14
15
16
17
public void createConfiguration(final Node node, final LogEvent event) {
final PluginType<?> type = node.getType();
if (type != null && type.isDeferChildren()) {
node.setObject(createPluginObject(type, node, event));
} else {
for (final Node child : node.getChildren()) {
createConfiguration(child, event);
}
if (type == null) {
if (node.getParent() != null) {
LOGGER.error("Unable to locate plugin for {}", node.getName());
}
} else {
node.setObject(createPluginObject(type, node, event));
}
}
}

通过构建器来穿件对象,首先通过createBuilder(this.class)来创建构建器,然后,通过反射对构建器设置属性值,最后调用构建器的build()来生成对象。通过工厂的方式也是类似的。

1
2
3
4
5
6
7
8
9
10
11
12
13
14
15
16
17
18
19
20
21
22
23
24
25
26
27
28
private Object createPluginObject(final PluginType<?> type, final Node node, final LogEvent event) {
final Class<?> clazz = type.getPluginClass();
...
return new PluginBuilder(type)
.withConfiguration(this)
.withConfigurationNode(node)
.forLogEvent(event)
.build();
}
public Object build() {
verify();
// first try to use a builder class if one is available
try {
final Builder<?> builder = createBuilder(this.clazz);
if (builder != null) {
injectFields(builder);
final Object result = builder.build();
return result;
}
}...
// or fall back to factory method if no builder class is available
try {
final Method factory = findFactoryMethod(this.clazz);
final Object[] params = generateParameters(factory);
final Object plugin = factory.invoke(null, params);
return plugin;
}...
}

createBuilder(this.clazz)是通过反射的形式扫描clazz类的方法,找到带有@PluginBuilderFactory注解静态方法,并调用它来生成构建器。

1
2
3
4
5
6
7
8
9
10
11
12
13
14
private static Builder<?> createBuilder(final Class<?> clazz)
throws InvocationTargetException, IllegalAccessException {
for (final Method method : clazz.getDeclaredMethods()) {
//通过反射获取加了 @PluginBuilderFactory 的方法,并通过反射调用此方法来获取构建器。
if (method.isAnnotationPresent(PluginBuilderFactory.class) &&
Modifier.isStatic(method.getModifiers()) &&
TypeUtil.isAssignable(Builder.class, method.getGenericReturnType())) {
ReflectionUtil.makeAccessible(method);
final Builder<?> builder = (Builder<?>) method.invoke(null);
return builder;
}
}
return null;
}

来看一个具体的栗子,加深理解。

配置文件中配置了一个追加器 Console,其对应的插件类型为 ConsoleAppender

1
2
3
4
5
6
7
<Configuration status="WARN" monitorInterval="1000">
<Appenders>
<Console name="Console" target="SYSTEM_OUT">
<PatternLayout pattern="[%level][%date{yyyy-MM-dd HH:mm:ss.SSS}][%thread][%class][%method][%line]:%message%n"/>
</Console>
</Appenders>
</Configuration>
  1. setup()方法中会将XML转换成Node(PluginType=ConsoleAppender.class,...)
  2. 在doConfigure方法中会扫描ConsoleAppender类的所有方法,找到带有@PluginBuilderFactory的静态方法newBuilder(),通过调用newBuilder方法获得构造器ConsoleAppender.Builder

到此,LoggerContext的初始化就完成了。

2. 通过LoggerContext获取Logger

通过LoggerContext获取Logger的逻辑比较简单。

  1. 首先尝试从缓存中获取,有则直接返回,没有则到下一步;
  2. 调用newInstance来创建一个Logger。
1
2
3
4
5
6
7
8
9
10
11
12
13
14
public Logger getLogger(final String name) {
return getLogger(name, null);
}
public Logger getLogger(final String name, final MessageFactory messageFactory) {
//先尝试从缓存中
Logger logger = loggers.get(name);
if (logger != null) {
AbstractLogger.checkMessageFactory(logger, messageFactory);
return logger;
}
logger = newInstance(this, name, messageFactory);
final Logger prev = loggers.putIfAbsent(name, logger);
return prev == null ? logger : prev;
}

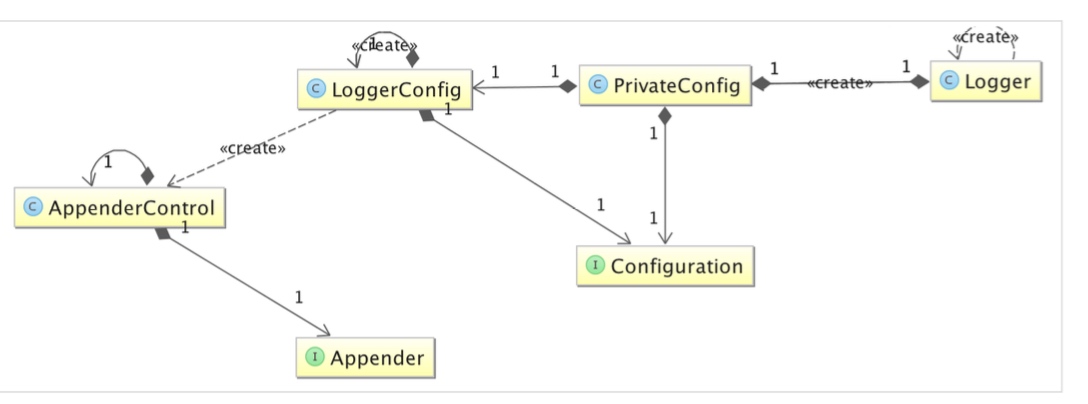
newInstance方法间接调用 Logger的构造函数来实例化一个Logger对象。

1
2
3
4
5
protected Logger(final LoggerContext context, final String name, final MessageFactory messageFactory) {
super(name, messageFactory);
this.context = context;
config = new PrivateConfig(context.getConfiguration(), this);
}

其中,PrivateConfig建立起Logger与具体的LoggerConfig的关联。
getLoggerConfig方法中可以看出:
1. 先通过Logger的名称看是否有与其名称一致的LoggerConfig,有则返回;
2. 通过以 .为分割符,从后往前截取字符串name.substring(0,name.lastIndexOf('.')),并以此来寻找是否能找到相应的LoggerConfig。若都没找到,则直接返回根LoggerConfig

比如Logger的名称为com.maoyan.order.biz,会顺序查找是否有 以 “com.maoyan.order.biz”、“com.maoyan.order” “com.maoyan”、“com”命名的LoggerConfig,若找到则直接返回,否则返回根LoggerConfig

1
2
3
4
5
6
7
8
9
10
11
12
13
14
15
16
17
18
19
20
public PrivateConfig(final Configuration config, final Logger logger) {
this.config = config;
this.loggerConfig = config.getLoggerConfig(getName());
this.level = this.loggerConfig.getLevel();
this.intLevel = this.level.intLevel();
this.logger = logger;
}
//AbstractConfig的getLoggerConfig
public LoggerConfig getLoggerConfig(final String name) {
if (loggers.containsKey(name)) {
return loggers.get(name);
}
String substr = name;
while ((substr = NameUtil.getSubName(substr)) != null) {
if (loggers.containsKey(substr)) {
return loggers.get(substr);
}
}
return root;
}

set up-w666

最终就完成了Logger对象的创建。

3. 触发日志事件

下面将从一条日志语句出发,分析进行日志操作的过程中,经过了哪些过程。

1
logger.info("Hello World");

首先,这条日志会间接调用AbstractLogger中的logIfEnabled方法,其中IsEnabled 会第一次调用Filter对象,判断是否可以继续下去;若Configuration没有配置Filter,则判断日志事件的Level是否大于对应的LoggerConfig的Level。ps:这里的FilterConfiguration的全局Filter

1
2
3
4
5
6
public void logIfEnabled(final String fqcn, final Level level, final Marker marker, final String message,
final Throwable t) {
if (isEnabled(level, marker, message, t)) {
logMessage(fqcn, level, marker, message, t);
}
}

当操作不被拦截后,进入Logger的logMessage方法。可以看出,操作最终交由LoggerConfig来处理。

1
2
3
4
5
6
public void logMessage(final String fqcn, final Level level, final Marker marker, final Message message, final Throwable t) {
final Message msg = message == null ? new SimpleMessage(Strings.EMPTY) : message;
config.config.getConfigurationMonitor().checkConfiguration();
//由LoggerConfig来执行操作
config.loggerConfig.log(getName(), fqcn, marker, level, msg, t);
}

LoggerConfig的log方法会对日志操作进行一次包装,封装成LogEvent,随后调用log(event)方法。

1
2
3
4
5
public void log(final String loggerName, final String fqcn,final Marker marker, final Level level, final Message data,final Throwable t) {
...
final LogEvent event = logEventFactory.createEvent(loggerName, marker, fqcn, level, data, props, t);
log(event);
}

可以看出,第二次调用filter,这里调用的是LoggerConfig配置的Filter。进行过滤后开始调用LoggerConfig中配置的每个Appender。

1
2
3
4
5
6
7
8
9
10
11
12
13
public void log(final LogEvent event) {
...
try {
if (isFiltered(event)) {
return;
}
event.setIncludeLocation(isIncludeLocation());
callAppenders(event);
if (additive && parent != null) {
parent.log(event);
}
} ...
}

方法中进行了两次过滤,第一次是调用Appender的Filter进行过滤,第二次当Appender实现了Filerable接口时,则执行接口方法。

1
2
3
4
5
6
7
8
9
10
11
12
13
14
15
16
17
18
19
20
21
22
23
24
25
26
27
28
29
30
public void callAppender(final LogEvent event) {
if (getFilter() != null) {
//第三次调用filter,此处的Filter为Appender的Filter
final Filter.Result r = getFilter().filter(event);
if (r == Filter.Result.DENY) {
return;
}
}
if (level != null && intLevel < event.getLevel().intLevel()) {
return;
}
if (recursive.get() != null) {
appender.getHandler().error("Recursive call to appender " + appender.getName());
return;
}
try {
recursive.set(this);
...
//第四次调用,当Appender是接口Filterable的实现类,则进行一次过滤
if (appender instanceof Filterable && ((Filterable) appender).isFiltered(event)) {
return;
}
try {
//调用Appender进行追加
appender.append(event);
}...
} finally {
recursive.set(null);
}
}

4. 附加信息

获取ConfigurationFactory

上面提到ConfigurationFactory会根据配置文件的文件类型来使用相应的配置工厂类,那么整个过程是怎么进行的呢?

1
Configuration instance = ConfigurationFactory.getInstance().getConfiguration(name, configURI, cl);

首先getInstance方法会收集所有可用的ConfigurationFactory,然后getConfiguration遍历所有可用的ConfigurationFactory

1
2
3
4
5
6
7
8
9
10
11
12
13
14
15
16
17
18
19
20
21
22
23
24
25
26
27
28
29
30
31
32
33
34
35
public static ConfigurationFactory getInstance() {
if (factories == null) {
LOCK.lock();
try {
if (factories == null) {
//首先,如果用户配置了log4j.configurationFactory,则将此加入可用的ConfigurationFactory队列中
final List<ConfigurationFactory> list = new ArrayList<ConfigurationFactory>();
final String factoryClass = PropertiesUtil.getProperties().getStringProperty(CONFIGURATION_FACTORY_PROPERTY);
if (factoryClass != null) {
addFactory(list, factoryClass);
}
//CATEGROY: ConfigurationFactory,通过PluginManager获取所有“ConfigurationFactory”类型的插件,加到工厂队列中
final PluginManager manager = new PluginManager(CATEGORY);
manager.collectPlugins();
final Map<String, PluginType<?>> plugins = manager.getPlugins();
final List<Class<? extends ConfigurationFactory>> ordered =
new ArrayList<Class<? extends ConfigurationFactory>>(plugins.size());
for (final PluginType<?> type : plugins.values()) {
try {
ordered.add(type.getPluginClass().asSubclass(ConfigurationFactory.class));
}...
}
//每个工厂类都有一个@Order(n)注解,按n的大小进行排序
Collections.sort(ordered, OrderComparator.getInstance());
for (final Class<? extends ConfigurationFactory> clazz : ordered) {
addFactory(list, clazz);
}
factories = Collections.unmodifiableList(list);
}
} finally {
LOCK.unlock();
}
}
return configFactory;
}

在获得所有可用的配置工厂后,接下来就来确定到底用那种类型的配置工厂。其逻辑在getConfiguration(isTest,name)方法中。

需要注意的是:在能找到多个不同类型的日志配置文件(json、yml、xml),因为会按yml -> json -> xml的顺序来加载配置文件并确定配置工厂。

1
2
3
4
5
6
7
8
9
10
11
12
13
14
15
16
17
18
19
20
21
22
23
24
25
private Configuration getConfiguration(final boolean isTest, final String name) {
final boolean named = name != null && name.length() > 0;
final ClassLoader loader = LoaderUtil.getThreadContextClassLoader();
for (final ConfigurationFactory factory : factories) {
String configName;
final String prefix = isTest ? TEST_PREFIX : DEFAULT_PREFIX;
//获取工厂支持的所有文件类型,然后拼接成最终的文件路径
final String [] types = factory.getSupportedTypes();
if (types == null) {
continue;
}
for (final String suffix : types) {
if (suffix.equals("*")) {
continue;
}
configName = named ? prefix + name + suffix : prefix + suffix;
// 如果能加载到文件名文件,则返回该工厂。
final ConfigurationSource source = getInputFromResource(configName, loader);
if (source != null) {
return factory.getConfiguration(source);
}
}
}
return null;
}

PluginManager的初始化

在上面整个分析过程中,可以看到多处用到了PluginManager,通过它可以获得特定类型的插件,那么这些插件是怎么初始化的呢?

事实上,在PluginManger初始化时,其属性 pluginRegistry(单例)初始化时,会调用decodeCacheFiles方法用于从META-INF/org/apache/logging/log4j/core/config/plugins/Log4j2Plugins.dat文件中加载并解析所有的插件类型对象,并按类别存储。目前共有6中类型插件:converter,lookup,core,configurationfactory,fileconverter,typeconverter

PatternLayout的特殊处理

在对配置文件解析时,一件有意思的事是,对日志输出样式的处理。
在日志系统初始化阶段,会对字符串形式的输出样式进行解析,将其转换为convetor的列表。在日志输出时,只需要顺序调用这些转换器,拼接返回结果得到输出内容。这样使得日志输出效率高。
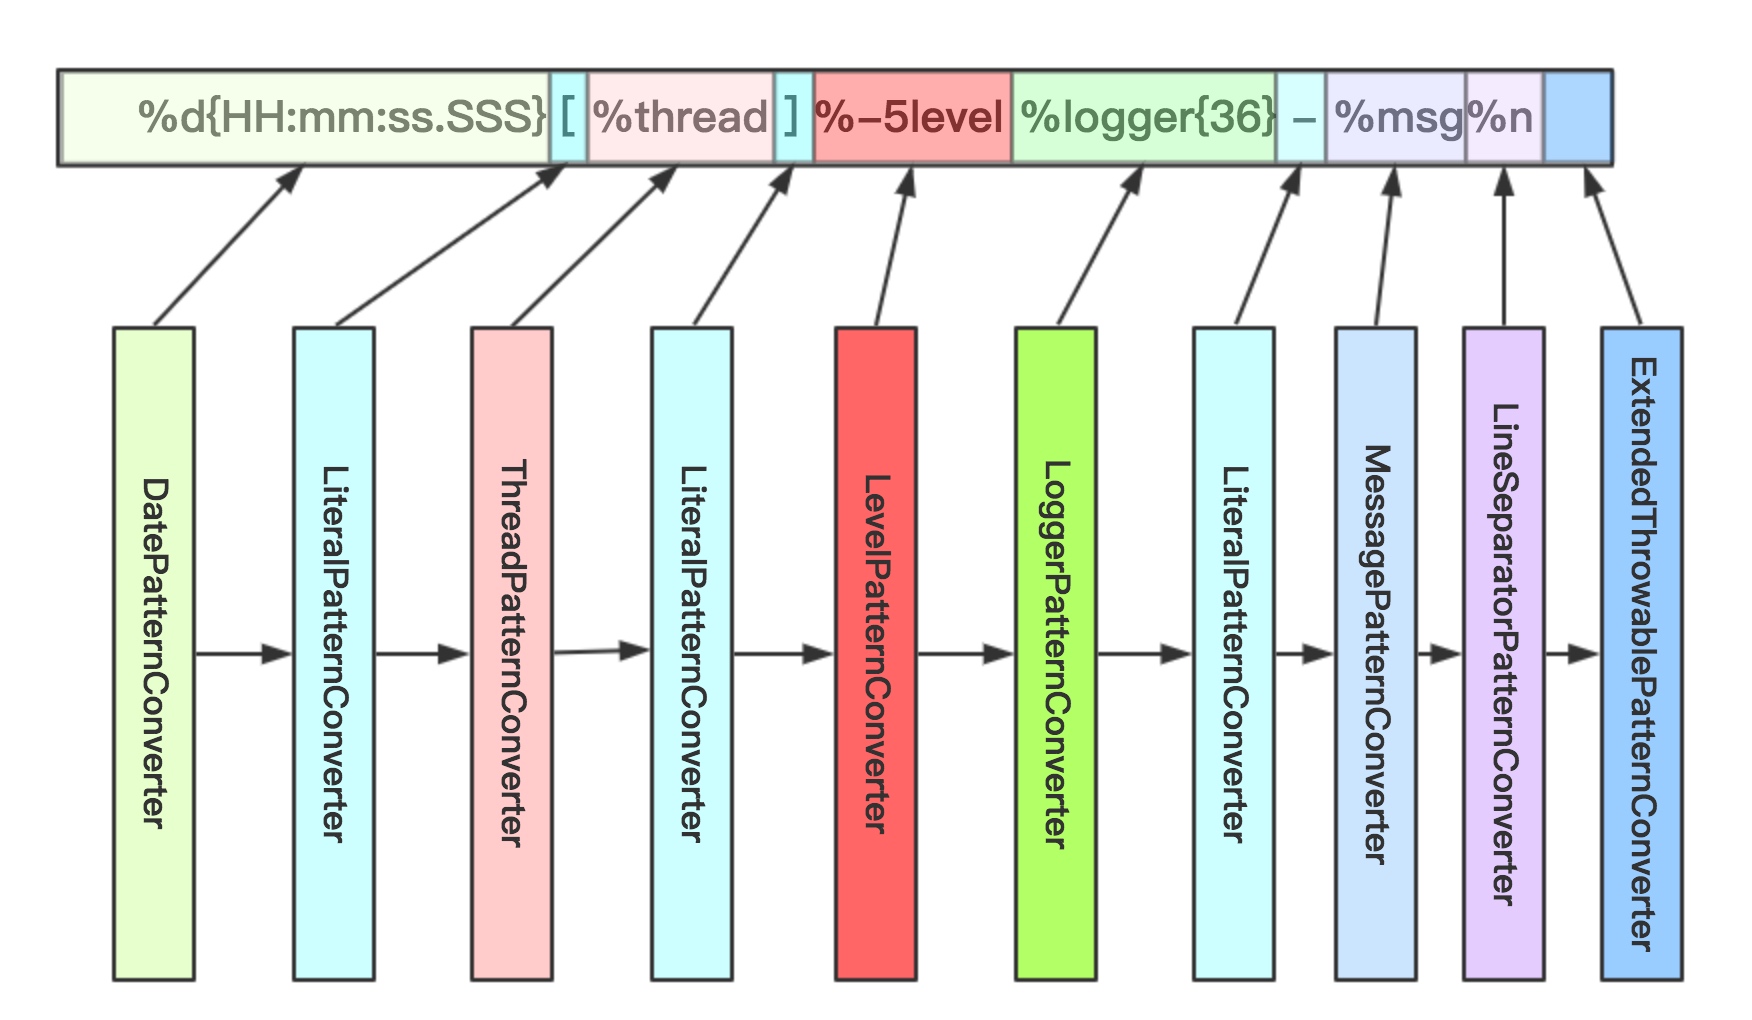
set up-w888

[TOC]

参考:

  1. Log4j2 Architecture
您的支持是我创作源源不断的动力